Please visit our home site at www.TRILOBOATS.com.

Anke and I live aboard WAYWARD, and wrote about it's design and construction at ABargeInTheMaking.blogspot.com.

Access to the net comes and goes, so I'll be writing in fits and spurts.Please feel free to browse the archives, leave comments where you will and write... I'll respond as I can.

Fair winds!

Dave and Anke
triloboats swirly gmail daughter com

Showing posts with label Gear. Show all posts

Saturday, November 1, 2025

Rigged for Success: LOM/Ljungstrom + Quick-Rig Booms


MUSTELID's LOM Main and Ljungstrom Foresail


Live life as if everything is rigged in your favor.

-- Rumi


Rigged for Success: 
    LOM/Ljungstrom + Quick-Rig Booms

I'd like to share a suite of ideas toward a family of lesser known rigs for smaller vessels that I think show a great deal of promise. Part historical, part convergent evolution, part innovation, the result is a simple but versatile, robust rig that can be DIYed at low cost.


Leg o' Mutton (LOM) Sails

This tasty moniker simply means a triangular sail. They're commonly used for headsails (jibs, staysails, etc.), mains (often called Bermudan sails) and drivers (small sails set far aft).


Ljungstrom Rig (2 x LOM)

Ljungstrom Rig uses a pair of LOMs, joined along their luffs and set on a free-standing, rotating mast. No booms were used to avoid troublesome impacts with crew.

This configuration works similar to twin head sails off the wind. From a beam reach on up, the sails are doubled over to one side and sheeted as one.

Pros:

  • Boomstrike is eliminated (the rig's original focus).
  • Light, inexpensive spares and gear.
  • Quick set/reef, roller un/furling via the mast.
  • Sailing off-wind, one side can be jibed for 'instant' 50% reef.
  • Sail area aloft catches higher, upper wind-flows.
  • Low Center of Effort (CE).
  • Twin sails tend to center down the wind.
  • Potential for hands-free operation.
  • Sail steering is straightforward (haul to the side you wish to sail).
  • UV resistant fabric along luff and foot eliminate sail covers.
  • At least in smaller vessels, the furled rig is easy to set and strike, and compact for storage.

Cons:
  • Lack of a boom makes spreading sail difficult (especially on narrow hulls).
  • No clew outhaul or vang options.
  • In contrast to twin stays'ls (unless the mast is canted) it generates no bow lift.

Adding a Boom

The addition of a boom set under a loose-footed LOM allows spreading, a clew out-haul and vang, addressing the main cons.

Interestingly, this approach was taken by both the Sea Pearl 21 (adventurously sailed by Stephen and Ginny Ladd, among others), and is marketed as Holopuni Quick-Rig (by Holopuni Canoes). Convergent evolution?

Both of these designs lead their clew outhauls via track along the top of the boom and sheets to the end of the boom. When the sail is reefed, the upward pull of the clew at mid-boom is resisted by the end positioned on the mast and the downward pull of the sheets at boom's end. 

As a sail's belly is blown full, pulling the clew strongly toward the tack, the boom resists in compression. If it is deflected from straight by the perpendicular pull of the clew between mast and sheet lands, that strength plummets. Usual solution? A heavy boom or one made with expensive, exotic materials.

Hmm.

What if we oppose sheet and clew tensions by having them meet at the same point? They cancel out, unloading the mid-boom! The clew outhaul - led to boom's end, then turned back toward the mast to the clew completes the picture. A rope grommet - travelling along the boom - is the perfect attachment point... simple, cheap and DIY.


Principle parts of the rigging...
This platform and 'collar' are primitive but functional

How We Go About It

Rotating Mast and Gear

In our small-ish boats, we went with a thumb-sized dowel protruding from the rounded bottom of the mast. This is inserted into a hole in its step - a fixed plate of thick HMD (cutting board plastic). This secures the foot but it allows it to rotate with very little friction. The upper partners are simply a loose-fit, fixed square around the mast. The distance between step and partners should be between 10% (minimum) and 15+% (healthy) of the mast's overall length for adequate cantilever.

A gate can swivel open to free one face for raising/lowering or close and lock to contain it. 'Box' sides at the step hold the foot in place for lowering. A pin led through one side and into a corresponding hole in the lower mast prevents rotation against high winds or rock and roll.

Each boom requires an arrangement that fixes their height above the partners, yet allows the mast to rotate independently. 

Our solution is a platform affixed to the mast with a collar from boom's mast end, around the mast, set above the platform... the collar is not so loose as to slip below the platform, but not so tight as to grip the mast.


Booms

Booms can be quite light as compression span decreases as the sail is reefed, and diameter per unit of span increases - functionally speaking, reefing makes them stronger. Further, they are subject to no significant side forces along that span. Sea trials help settle in on a light boom with comfortable margins of safety.

Each boom has a rope grommet loosely fit around it (sized so it doesn't bind when pulled at a flat angle). 

We fix a pinch cleat for the clew outhaul at the boom's mast end, pinch horn down (10deg) toward the distal end. This allows the line to ride over the non-pinch horn (up and toward the mast), under control hands-free as it pays out while furling.

A ring seized to the distal end of the boom turns the outhaul back toward the grommet.

The outhaul leads from its cleat, through the grommet (helps control a slack outhaul) to the turning ring, and back to the grommet. We fix it to the grommet's upper side, allowing a tail which is tied to the clew. We prefer little play between clew and grommet.

The sheet is fixed to the grommet's lower side and led to deck level. A turning device (multiple or travelling for an improved lead?) leads it toward a clear, handy to the crew. We prefer enough friction on the cleat to hold in steady wind but ease in heavy gusts... no lock hitch.


Sails

We used light nylon fabric to build flat-cut sails. These are responsive, and furl neatly around the slightly tapered masts. They are stretchy enough to take on some belly (camber) when full of wind.

Downside is that camber can't be flattened easily in high winds. But reefing is so easy, we can reduce power that way.

For 2xLOMs we screwed the webbed luffs to the mast, but are now considering a pocket for easier installation and removal. Others have found that a simple lanyard from tack to mast is sufficient for furling.


Handling the Ljungstrom

We set the Ljungstrom sail well forward, where it can pull us bow down the wind. 

We don't typically vang our sails to flatten them. Instead, we vary the sheet leads and/or reef a little more than we might. This avoids extra gear, handling and the heavier booms required. Personal call, however. 

Furled Set Up

When furled, the sail is snugly wrapped around the mast. The boom(s), if any, are vertical. Sheets are left slack and hanging. One clew outhaul is marline-hitched once or twice along the mast, securing all the bits, then made fast at its pinch cleat (low).


Setting Sail

Unhitch the outhaul, then refasten to its cleat. Uncoil sheets and lead aft to their cleats. Both outhaul and sheets will go slack as the sail is unrolled. Unpin mast if locked.

Depending on wind, you might wish to round up. For downwind departures, you may have to work in stages, trimming sheets as you go.

Unroll the sail by rotating the mast (we prefer 'righty-tighty; lefty-loosey' as standard... we do this by hand, but various rope windings are possible).

Once unfurled as far as desired, haul the outhaul(s) for the curve you wish, then make fast. Trim sheets and fall off to heading. Backing sail is easy and effective. If you wish to open the sails, do so.


On the Wind

Here the sails are overlapped and are sheeted as one (outer one generally the focus of our attention). They handle pretty much as any boomed LOM.

Off the Wind

Sailing off the wind, the sail is typically balanced like a delta kite. All things being equal, it want s to hold the bow centered downwind. More belly is often a good trade-off against more area.

To steer using sail, haul the sheet on the side toward which you wish to turn (easy, now!). This shortens its force vector and directs it to that side. The opposite sail, now relatively stronger and with a longer lever-arm, works to rotate the hull that-away. Like the reins of a horse!

In a heavy gust, you have a 50% reef at hand. You can jibe one sail (lapping one over the other) or let it fly (this can be harder to retrieve... get a wide angle). But if this comes up, consider roller reefing ASAP. Consider that, in high winds, you don't have to set them wing and wing... they sail well as one.


Odd Situations

If a sudden squall has invited letting both sails fly (they're trailing down the wind from the bow), calmly roller reef until you can bring them in and under control.

If such a situation has reversed their usual sides, don't panic... just hand the sheets around the mast, or refasten them for a fair lead and carry on. The sails won't care.

The whole mast, sails and all, can be furled, hitched up and let over as a sea-anchor.

All in All

We found these LOM/Ljungstrom + Quick-Rig Booms to be simple, cheap, versatile and powerful. Each piece is DIY-able from scavenged materials. Nothing about them couldn't be made in the field, at a pinch.

The lightness of the spars is a BIG advantage, especially as we age. The masts should be manageable for as long as we're likely to be able to row.

In researching the history of the rig, the few who have used it are soberly impressed by its virtues. It is not the fastest rig out there, but its no slouch, and pays its way with easy handling and quick reefing.

I'm hoping to see more of these on the water in the coming years!


Full Ljungstrom / Reefed LOM
Sprit-Boomed LOM Aft


References

Sea Pearl 21 Review by Josh Colvin

About Holopuni Canoes by Nick Beck

Rigging MUSTELID and MUSTELID Voyage by Anke and Dave


Monday, October 20, 2025

LUTRA Update: Building Blues and Bloom


A Work in Progress


Rome wasn't built in a day.

-- Old saying


LUTRA Update: Building Blues and Bloom

There are two things I yammer on about:

  1. Small is beautiful.  - E.F. Schumacher
  2. Curves and angles add to building time and effort.  - Me
Yeesh. I should listen to myself.

We're just rounding the one year mark on what we'd estimated to be a four month project. Six months if the stars mis-aligned.

A winter build - now approaching another? -  interrupted work with deep-freezing spells and general hypothermia, leaving us staring stupidly at simple tasks. Weather - exceptionally cool/cold and wet stretched from that winter, through spring to latish July, bringing mildew in its train. A series of guests (whom we thoroughly enjoyed) brought a warm spell that ended promptly with their last departure. Back to hypothermia. Our short-handed community has needs with few to step up. Our own life has chores that can't be indefinitely deferred.

It adds up to a blues riff.

But one step in front of the other. The structure is complete and we're building and tacking on gear (hatches, tabernacles, bow rollers, cleats, rails, rudder/tiller, etc.). In a week or two - barring further issues - we'll start the simple interior, then windows, then launch. we're hoping for 2025.

So we persist. We dream of returning to life at large among the islands.

We bloom.


*****

It's a challenge taking photos from point blank!


Rowing Cockpit from Forward
Longitudinal Seat/Lockers between Self-Bailing Decks
Main Tabernacle at Main Bulkhead


Rowing Cockpit from aft
Longitudinal seat lockers to Leanbank/Fo'c'stle Hatch
Fore and Main Tabernacles visible


Monday, April 21, 2025

Metronomics: Understanding Roll


Note the weight positions... higher = slower ; lower = faster


Now roll on, Buddy?
Why ya roll so slow?
I gotta roll slow
With my weight so low.

-- Adapting a Folk Song

Metronomics: Understanding Roll

Being an Old Fart, I had the privilege of growing up with mechanical metronomes. Mechanisms - as opposed to algorhythms - that set and keep the beat.

Metronomes keep the beat, adjusting their tempo by sliding a weight higher or lower along a bar

Higher Weight = Longer / Slower

Lower Weight = Shorter / Faster.

Puts me in mind of the dreaded short and snappy roll that fatigues and throws crew around if not overboard. Longer, slower roll periods are desirable. Up to a point. Beyond that point, they can become self-reinforcing and enter 'death roll' dynamics. We're with Goldilocks... we're looking for a sweet spot that's juuuuuust right.

Being a sailor, I can't help but see roll dynamics in the metronome.

Bar = Mast
Weight = Rig's Center of Gravity (CG)
Axis = Hull's Center of Buoyancy (CB)
Counter-Weight = Ballast CG

Tempo = Roll Period

The connection is easy to spot. We can adjust roll period (by raising and lowering the Rig's CG while all other points remain constant.

A baseline is established by weight distribution along the mast, most likely at construction time. Hollow masts offer lots of options for messing with distribution via placing of  internal weights. Choice of hardware (e.g., masthead fittings, blocks, spreaders, etc.) for weight placement all count. Designers aim for one-size-fits-most.

Junk Rig is interesting... as the sail is raised, more weight goes aloft. Typically the yard is heaviest at the top, while battens average out(?) along the mast. The total effect is that more sail slows roll.

This suggests the possibility of elective roll period manipulation via weight that can be raised and lowered to adjust for conditions. The challenge would be a 'doohicky' which would observe these Thou Shalt Nots...

  • Not be difficult to deploy
  • Not interfere with the rig
  • Not swing wildly
  • Not be difficult to dowse
  • Not be difficult to stow
While giving a seriously positive return cost/benefit ratio-wise.

Clearly, the need for roll control will all have a lot to do with the roll dynamics of the hull in question. Low form stability (/easily driven) hulls will benefit more; Form stable (/it's complicated) hulls will benefit less.

How do you roll?

Thursday, January 23, 2025

Tiny Tools: Toward a Compact Tool Set


The right tool for the job?
It's complicated.


Tiny Tools: Toward a Compact Tool Set

Keeping a full set of tools on board to handle any repair / rebuild / maintain job that might arise out there is great insurance.

But we who live in small spaces must be picky-choosy. If we can, we look for the following attributes in our tools:

  • Competence - They must be able to get the job done.

  • Versatility - The more jobs they can tackle, the better.

  • Synergy - They should work well with other tools.

  • Economy - Either inexpensive or long-lived (preferably both!).

  • Small Footprint - Small is beautiful! 


Anke and I acquire what looks to be useful. Often (not always) a low purchase price indicates low quality. But we've got a tool in hand, and often find an opportunity to trade up down the road. Much more often, we'll find that a problem we face was well-solved back in the day, and we can find used tools that are no longer in common parlance for dimes on the dollar.

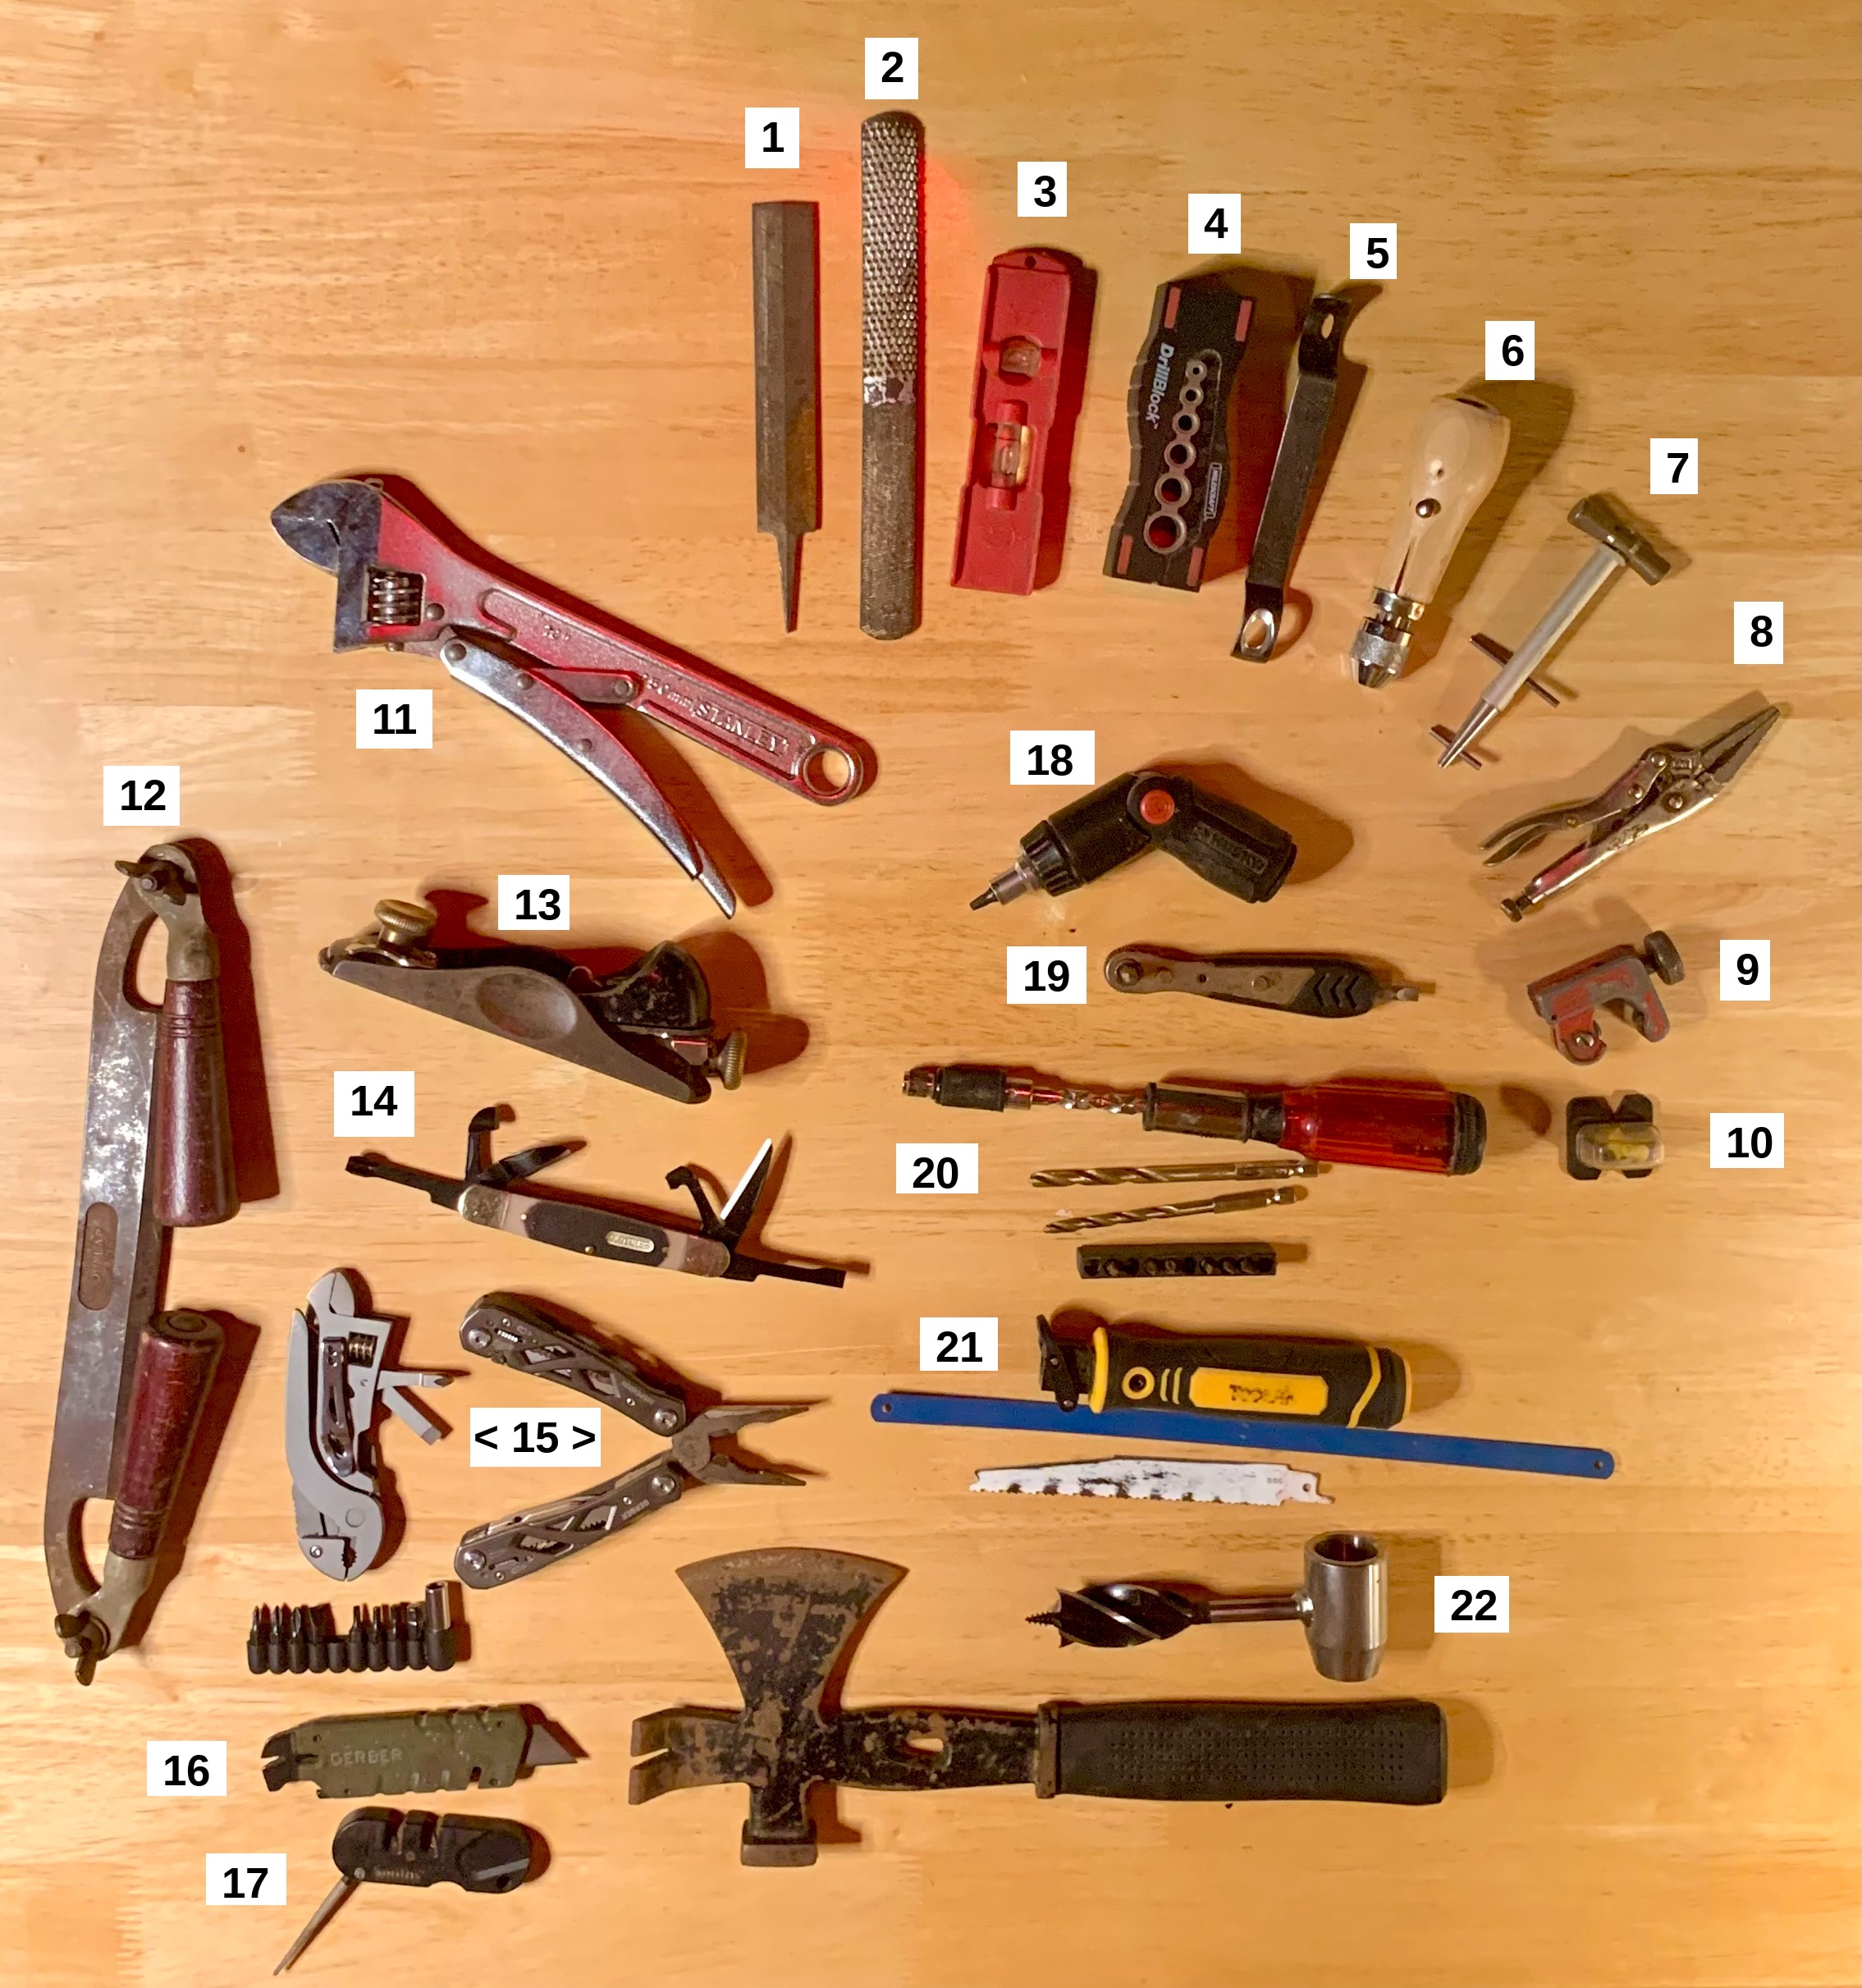
What follows is an annotated list of some of the less well known tools we've found to be both compact and useful. Please excuse signs of salt-water exposure... they're lately having a rough life!

*****


Notes

  1. Feather File - Very fine edges and a medium cut.

  2. 4-Way Wood Rasp - Flat and convex faces in rough and medium cut.

  3. Small Level - To be honest, I've never used it on a boat. But for infrastructure?

  4. Drilling Jig - Solid 90deg drilling guide when required (e.g., block pins).

  5. Veritas(TM) Rounding Tool - 3/8 and 1/4in round... on plank and ply edges.

  6. Stitch Awl - For heavy sewing (e.g., leather, sail patches, etc.).

  7. Clamp-Tite(TM) - Forms and locks a tight, light wire clamp similar to a hose clamp but any size (larger tools available). Great for clamping a broken spar or any hose.

  8. Needle Nose Locking Pliers - Very versatile. Great for working copper tubing. These are VISE-GRIPs(R).

  9. Pipe Cutter - We use this to cut copper tubing to 3/4in.

  10. (Ferrous) Nail Finder - Magnetic post points to a hidden ferrous nail. If using non-ferrous fasteners in hidden-frame construction, steel locator nails can be included to help find hidden framing years down the road.

  11. Locking, Adjustable Wrench - Not a 'mini' tool, but unusual. Adjust as normal, then lock down for a secure grip on the nut with no self-adjustments as you work.

  12. Folding Drawknife - Mostly available as antiques.

  13. Low Angle Block Plane - Handles virtually all of our planing. IMHO, low angle planes work as well or better than ordinary angles (with the possible exception of a scrub plane).

  14. Schrade(TM) Carving Folder - A useful carving set for fiddly work in a small package.

  15. Multi-tools - These handle most of our odd-job maintenance work.

  16. Gerber(TM) Utility Knife - For sharp cutting and light prying.

  17. Smith's(TM) Blade Sharpener - V notch and Serration. Complements our Sharpal(TM) Diamond 'Stone' System (not shown).

  18. Ratcheting, Adjustable Angle Bit Driver - These are a great combination. They tend to be not as well made as they deserve, but are cheap and seem to last. We like shorties like this one (Husky(TM)).

  19. Low Clearance, Right angle Bit Driver - For tight spaces (about 1in). This one also accepts an in-line bit at handle's end (convenient!).

  20. Bit Driving, Ratcheting Push 'Drill' (aka 'Yankee') - Saves a lot of wrist work, and with the hex-bit drills shown, can double as a light duty drill. Check that it accepts hex bits... the true Yankees had a superior but no longer standard split shanks system.

  21. Hack-, Jig- and Sawzall Blade Handle - This particular model accepts all three with a quick and secure release. More are coming available, so shop around. Beware... some of the name brands have been disappointing.

  22. Hand Auger/Dowel Maker - 'Shawn of the Wild' improved a Scotch-Eye Auger by lengthening the ring, setting its I.D. to the O.D. of the auger bit and creating a pocket mortise-and-tenon machine! Brilliant!!! Many are following in his footsteps but beware, not all are clear on the concept (especially as found in sets).

  23. Utility Hatchet - These vary in quality, but if well made are handy li'l guys. They can be modified to suit your tastes (e.g., shape and cross-hatch the hammer head or change the cutting bevel of the hatchet head).


We have a universal socket (one of those with lots of pins which fit around any nut). Though not as robust as a solid socket, it can handle a surprising amount of torque. Plenty to make it useful for most of our needs.


Better yet, we have a Metwrinch(R) Set. Instead of dual Imperial and Metric sets, with 'teeth' bearing on nut corners, these have 'cams' bearing on nut flats. The play provided before bearing hard allows one tool size to securely grip near neighbors from either system. AND, since it's not bearing on the corners, there is little to no tendency to strip. In fact, they work until the flats themselves are rounded away.


Folders

  • Fastcap(TM) 1in Chisel - These guys offer a range of standardized, folding tools, singly or in kits. They include chisels, saw, rasp, putty and linoleum knives, scratch awl, etc.. Very well designed and made.

  • 'Butterfly' Dozuki / Ryoba Saw - Folded handle protects blade (and us!). This one is about 6in folded.

  • JOIC(TM) Folding Drill - This one is antique only, but what a tool! Handle folds 90deg and screw end-cap holds bits. Chuck and gear rotate 90+deg. At about 9in, it can fold way down and function as an angle drill to 90deg. Both options lock down securely. We saw many of them on Ebay.

  • SvenSaw(TM) - Simple, solid set-up and stows in-line. These have been around for 60 years, now. My only quibble is the teeth are pulse hardened, so can't be kerfed... we're looking for untempered replacements for all our bowsaws.

*****

These aren't our whole toolset, but they do 90% of the work. The rest are fairly standard heavy lifters.

On WAYWARD, we have a large toolbox in deeper storage and a small one at hand. Many of these small tools go into the little one, and handle our day-to-day needs quite handily. It's not until we're really building something major that we dig out the big 'un.

For the future, a smaller vessel will require fewer tools and favor a yet smaller footprint. The quest for the ever-more-compact erector set goes on!


TIP: If we standardize our fasteners (and other such accessories), we can much reduce the necessary tools. For example, limiting ourselves to #10,  1/4in, 3/8in, 1/2in and 3/4in screws and bolts with, say, square drive or hex cap/nuts, both our inventory and tools can focus in.

Sunday, October 27, 2024

Perfect vs. Good


From Adam Bager's post The Perfect is the Enemy of the Good


Perfect is the enemy of good.

- Voltaire


Perfect is the enemy of done.

- Catherine Carrigan


Perfect vs. Good


Scant on wherewithal, experience, knowledge and wisdom. Rich in dreams and hope. Foolish youth embarked into a sun yet on the rise.

We sailed off the charts and beaten paths, beyond the lights and markers. Back ways through reef and slough. Up nameless rivers. Between scattered towns.

*****

It all began with a set of chisels…

They've arrived!!

We’d have flipped for it, but Anke loves opening packages, so she always wins.

A cut here, a snip there. Some eager shucking of wrapper, and a well-made cardboard box was revealed to our greedy eyes. We could smell the cherry blossoms brushed over an industrial green background. They framed a spare script writen in bold, black strokes and arranged in vertical columns.

Kanji… Japanese.

Flushed with anticipation, we canted the lid slowly back on its paper hinge, with each a hand on one corner to share this moment of discovery. 

There! Lying in eight parallel compartments, each aglow with a rainbow sheen of oil. There they lay. Our beautiful set of temple builders’ chisels lying side by side.

Their lemony, heart centered, box-wood handles were steel ringed and socketed. We could see the darker line of steel edge we knew to be hardened, bonded to a laminate of polished metal visible as a sinuous line across the just-so bevel .

Trembling, Anke reached out her hand to lift one, turning it over to expose the underside hollows… Hollows! …that had been ground into their lower face. An ancient method, we had read, to reduce friction while paring.

These chisels were no ordinary tools. They were fit to build homes for the gods! 

Nor were they cheap. For us, they represented a significant investment in our future afloat. As sailors and masters of our own vessels, we would see to their needs as they would see to ours. 

BRAMBLE, a clinker-built British life-boat, was our first home together. She had been converted to a sailing cruiser sometime in the dim past. We had bought her as-is, hoping to learn, through her, initial sailing and boatwright skills. A strategic stepping stone on the way to a proper yacht.

She was in need of serious work. Now we had serious tools. 

Reverently, we took up the chisel appropriate to the task. A gentle, forward pressure and a feather of larch curled upward and back upon itself. Devoid of effort, this magical tool glided forth to do its work. 

Straight and true and clean and — TINK. 

Hmm… that sounded like we hit something. It sure felt like we hit something. And… a gnat-sized chip now marred our previously perfect edge!

We glared accusingly into the cut and a tiny, metallic glint sneered back. It was the jaundiced yellow of a coppery wire strand, souvenir of some long-ago brushing.

Many hours with a stone (finest waterstone, of course) elapsed. Many timorous taps with the special mallet backed the hollows away from the edge, proportional to the material we’d removed. The edge was restored!

Well. To spare you agonizing repetition, our very next efforts met with the same INSUFFERABLE results.

We traded our beautiful chisels to an overjoyed boatwright (who dealt in new construction with only the highest grades of wood) for a plain set of framing chisels. Cheap, robust and easy to maintain the edge.

*****

In hindsight this trade was our first entrance into 'the real world' where perfection isn't all it's cracked up to be. It's not bad in itself, but more like a guideline, really.

Perfect is elusive, fragile and an end-in-itself. Good is at-hand, rough-and-ready and gits 'er did.

It's a choice.

Tuesday, December 5, 2023

A DIY Rocket Stove Smoke Hood


Eco-Zoom Rocket Stove with DIY Smoke Hood


Somebody who claims to speak for the ‘hood don’t need no private jet.

– Chuck D


A DIY Rocket Stove Smoke Hood


About half of the energy in wood literally goes up in smoke, and with it, a good deal of our own! If the smoke can be burned, efficiency nearly doubles. The corollary is that only half as much fuel produces a given amount of heat.


Rocket Stoves were developed as a low-tech solution. At their heart is an L shaped, insulated tunnel, wide open at both ends. Fuel is fed horizontally, oxygenation and combustion burn hot at the crux, and what little smoke is left is pushed vertically, up and out the top. Typically, a pot directly atop the stove absorbs heat from the hot, gaseous outflow for cooking.


We’ve been using an EcoZoom Rocket Stove for years as a nearly smoke-free, otherwise open deck fire for outdoor cooking in hot weather, an evening blaze in nice weather and to heat metals for various projects (it easily takes ferrous metals to red-hot). It runs on limbwood from about thumb to wrist size, the former for cooking and the latter for longer, more subdued heat. In short, perfect for easy wood-gathering, especially as we age..


In planning MUSTELID, we hoped to bring this marvel indoors for cooking and heating. It requires far less wood to gather, dry and store within her small volume. Being insulated, wood can be dried directly alongside the stove, warm but nowhere near wood’s flashpoint (we can touch the stove sides without burning!).


To bring it indoors, we must gather and direct combustion gasses outboard, like any other onboard stove. The solution is a smoke hood fit snugly over the stovetop with a stack, which has the extra perk of increasing the cooking surface area. We wanted one more feature… we wanted to easily install and remove the stove for outdoor use on deck or ashore. So we went for a swing-up, cantileverd variation.


This called for some head scratching…


Grate spacer for airflow under,

Ash tray…

Whole thing slides aft behind bulkhead lip

And between heat / splatter shields.


Removed...
Note black fire-retardant pad
protecting carpet from sparks


Swing hood upward to remove


A look under the hood...
a vertical ring fits closely over upper plate
for extra fume collection


*****


Smoke Hood Plan
Not to Scale


Smoke Hood Elements


At it’s simplest, the hood is a flattish box made from sheet metal (in our case, stainless steel from and old stove’s grease trap… a heavier top plate has better thermal mass for cooking, if available. A large hole in the bottom fits closely over the Rocket Stove top, while a smaller hole in the top has stovepipe fit into it, which leads to a standard deck-jack and smokehead. If you leave the stove in pace, this is all you need.


For a swing-up top – allowing removal of the stove – we broke the hood into two boxes, each with an open end:


  1. The far box is fixed (in our case to bulkhead and flanking heatshields), with the flue let into its upper surface. Its near end is open, with rounded shoulders and an under-lip. This part is female, slightly larger than the second part.

  2. The near box is cantilevered (stops may be additionally fitted to help support heavy pots). Its far end is open, with a partial rounded shoulder fairing to 45deg… extending an over-lip, while the angled section limits upward swing. This part is male, slightly smaller than the first part. Insert its open end into the female’s until their respective hinge-pin holes align.


Other parts:


  • The long hinge pin (alternatively, short, opposing pins) are let through paired holes centered on the shoulders. If it binds while swinging upward, grind away from the lower male shoulders till clear.

  • A vertical smoke collar can be used around the stove-top cut–out (not sure it’s necessary). We used a strap of sheet metal, its edges doubled over just short of its outer mid-line (result about one inch wide) and tabbed around its outer mid-line (tabs bent alternately, slightly away from cut-out). When pressed into place, it ‘snaps’ in to lock. It works best to cut the tabs before bending.

  • Rims, rails, bars and what-have-you may be added to secure pots while cooking underway. In our case, we added a low front rim and let that and tall heat / splatter shields along each side contain pots. Watch for swing-up clearance.


Notes:


  • Any gaps allow air to be drawn into the hood. The closer the fits, the more energy is available for cooking and heating. Once the stove is drawing (seconds) there appears to be no leakage, even from wider gaps. We didn’t use gaskets, but they can’t hurt.

  • We sized our male part to be 1/16in smaller than the female’s inside dimensions. Given our crude techniques, we managed between 3/32in and 1/8in. So long as it slides in without undue forcing and the gaps are small, it should work fine. Thermal expansion binding isn’t a problem as we only ever move it out once cool.

  • In both cases, the lips should overlap the opposite part to help close the gap and contain ash. Small tabs may optionally be bent along single edges to help minimize warping with heat.

  • Sizing can be more or less according to your available space. We sized around our frypan plus our small teapot, to cook and heat water at the same time.

  • The smokehead can be lower to the deck than is usual. Although it does induce some draft, Rocket Stove’s generate expansion in their combustion chamber, and actually push gas about 40ft. Still, an efficient draft smokehead hedges our bets in some gnarly conditions.

  • We didn’t have a brake (sheet metal bender), so clamped sheets over a piece of sharp-edged hardwood, then hammered it over. Cutting was with a thin-wheel grinder and touched up with a mill file. We used bent tabs with (copper/stainless) pop-rivets to join. Wear gloves, eye, ear protection and work safe!


Looking Ahead


One of the intriguing possibilities with Rocket Stoves is to make our own from a substance that insulates, absorbs and radiates thermal energy. In other words, which acts as a thermal mass or ‘sink’. Such are easily made from brick, firebrick, concrete, clay, cob and other materials. 


Perlite (pumice) is a light, inexpensive insulator, and can be mixed with concrete for a lightweight aggregate with decent thermal mass. The combustion chamber can be lined with refractory clay. A thick, steel cook surface is easy to install over a lipped smoke chamber for a full sized stovetop / smokehood. Sand makes a good gasket between plate and stove. Alas, this doesn’t sound very portable!


But we keep on thinkin’.


Saturday, August 26, 2023

5VDC Revolution for Smallish Boats?

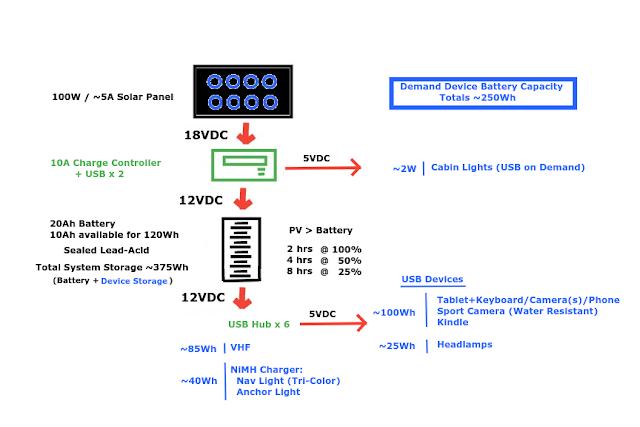
MUSTELID's 5/12VDC Hybrid Electrical System
(Lithium Ion Batteries are HAZMAT, so we went with Lead/Acid)


An immense effect may be produced by small powers
Wisely and steadily directed.

-- Noah Webster


5VDC Revolution for Smallish Boats?

A while back I wrote about a simple 12VDC system, here.

For a very long time, 12VDC systems have been the go-to foundation for small vessels. There's been a host of products available both in marine and RV/auto markets that meet all the needs of the small scale sailor.

But there's a quiet revolution boiling along for the last decade or so, and it's reaching maturity. I'm speaking of USB charging, 5VDC systems. 

From charging arrays (PV) to controllers to lightweight, high-capacity batteries to products ranging from smart phones, laptops, GPS, VHF, depthsounders, navlights, cabin lights, spotlights... all has become available at generally lower up-front costs and considerably lower draw.

Many of these devices have rechargeable, onboard batteries, each of which can contribute to total power storage, eliminate runs of wiring and reduce the size of a central battery. USB 'hubs' serve as power strips for centralized charging and flexible power supply.

If your vessel is already set up for 12VDC, it's likely most economical to stick with it, or possibly hybridize with a USB hub to handle new acquisitions. 

But if you are outfitting a small vessel, particularly in the micro-cruiser range, The small footprint and low draw of 5VDC is well worth a look!

Thursday, April 15, 2021

Optimal is Not Optimal: The Sweet of Suites

Heh. Clever. But I believe...
A generalist knows more and more about more and more
until eventually s/he knows something about everything.


A human being should be able to change a diaper, plan an invasion, butcher a hog, conn a ship, design a building, write a sonnet, balance accounts, build a wall, set a bone, comfort the dying, take orders, give orders, cooperate, act alone, solve equations, analyze a new problem, pitch manure, program a computer, cook a tasty meal, fight efficiently, die gallantly. Specialization is for insects.
-- Robert A. Heinlein

If one's only tool is a hammer, every problem looks like a nail.
-- The Law of the Hammer

Avoid optimization; Learn to love redundancy.
-- From Nassim Taleb's Phronetic Rules


Optimal is Not Optimal: The Sweet of Suites

Let's get it said, upfront. I'm a Generalist. Jack of Many Trades. Proud Master of None.

I'm much less drawn to Rules than to Rules of Thumb. I admire precision, but prefer the loose fit. I'll take one-size-fits-most over tailor-made any day of the week. 

So here's the problem with Optimal. It is by definition the very best solution for a particular problem. Often very particular problem. A problem one can foresee with great confidence and specificity. A can opener. A mouse trap. A barrel bolt. These things have solutions that are pretty durned optimal and are notoriously hard to improve upon.

But problems abound, and each has its own, special way of driving us bugnutz.

Generalized (sub-optimal) tools and approaches cover a much wider range of problems. So wide that they often spill over into other whole species of problem. A suite of generalist tools - especially those which work well together - cover a very wide range indeed.

In discussions I read on the subject, Specialized vs General evaluations tend to measure in degrees of Success (often vs Failure). For example, a Specialized tool has a high degree of success, but only at a narrow task. The Generalized tool is assessed at some lower degree of success, but over a swathe of loosely related tasks. Most such writers argue for the General.

What I think is often missed is that Efficiency is a much better standard. The Generalized tool will succeed... it just takes longer for a small fraction of that range. That it does so over a wider range of problems is a better measure of its advantage over Optimal. It is less efficient at one particular task, but more efficient overall.


Veritas rabbet planes


Consider the Rabbet Plane vs the Chisel.

I'm not knocking the Rabbet Plane. This one by VERITAS is a well designed thing of beauty and a boon to the task. If your life calls for a lot of rabbets, it may pay its way. But it's not happy performing most of the other chores one asks even of a plane. Very bottom line, it's a specialized Chisel.

But which fits better into a limited space toolbox? Which is less expensive to purchase? To replace or repair? Can it do any single thing a chisel cannot? No. Can a chisel do things it cannot? Let me count the ways... (okay, I won't... you get the picture).

Another important consideration is reliability. Given quality components, this is the product of simplicity (less to go wrong) and imprecision (loosely 'coupled' components).

Okay, I once said, I get KISS. But imprecision is a virtue??? 

Turns out that precise, tightly coupled systems are prone to failure. The kind of failure that chewing gum and baling wire can't fix. A little sand in the finest Swiss watch and it will drop to merely semidiurnal success. But one can make a sundial with a stick stuck into sand. If it gets kicked over, stick it again and recalibrate. [We can also use that stick to lean on, plant a seed, pry a up a rock, bind a tourniquet, whack a mole...]

Efficiency, as I mentioned, is a factor here... that sundial has its limitations in this regard. Cost / benefit analysis is the guide. That stick is very efficient, in its modest way.

A final point I seldom if ever see discussed is how well tools (or approaches) work together in suites (combinations). What I call the sweet of suites.

Simple, generalized tools can join forces to accomplish almost anything! Their areas of efficacy overlap, affording redundancy and  choice. A heavy screwdriver can be a prise bar can be a chisel can be a lever can be a...

NOTE: We are strictly warned against abusing a tool beyond its designed purpose. HA.

A sweet suite of tools, skills, approaches, methods, guidelines... what-have-you... covers the ground. Covers it better, to my mind, than any ungainly heap of one-shot wonders.

Sweet.


NOTE: I realize that all this is, in fact, a spectrum. At the KISS extreme, brain + opposable thumbs are as simple as it gets, and all the others are to some degree specialized. The kind of optimal we look for will always be the happy middle ground.


Saturday, July 18, 2020

Fishin'

One of many approaches to Hobo ReelsIs that a KIRKLAND Whiskey Bottle cork capping the bottom???

50 Best HOBO HANDLINE images | Fishing kit, Bushcraft, Hobo
Rigged with hook, line and keeper


Alive without breath, as cold as death;
Never thirsty, always drinking;
Clad in mail, never clinking.

-- One of Gollum's riddles from The Hobbit by J.R.R. Tolkein


I'm a-goin' fishin',
Yes I'm goin' fishin',
Baby goin' fishin' too!

-- From Fishin' Blues by Taj Mahal


Fishin'

I've got to say right off that I'm not a fool fer fishin'. In fact, if fish weren't an important part of our diet and livelihood, I'd never set a hook. Anke, on the other hand, you might say is 'avid'.

For me, I'm looking to maximize the efficiency and minimize the sport. To do as little harm as possible, both to those too small to keep and those whose life is taken for ours. To cultivate a spirit of humble gratitude for a fish's life. To console myself with the knowledge that they are fellow predators dancing in the web of life.

For many years, Anke and I have subsisted on smaller fish- rock cod, pink salmon, dolly varden (between a trout and salmon). Lacking refrigeration and unable to carry the weight of jarred fish, these are all we can eat while fresh. Now, however, we have the displacement and tools for jarring, and have our sights set on larger salmon, halibut and dogfish (a small shark).

But these still swim mostly in our future.

Our fishing rods and reels are accordingly very light. Usually the cheap-0 kid's reels. They live on deck, ready to hand, and last a few years. But they're seldom made for salt water and get cranky. And they tend to hang up on this and that at inopportune moments.

Recently, I stumbled across hobo reelsDIY, compact and effective.

Plastic container types offer near instant gratification and are very practical, since they take little or no modification and securely hold a lot of gear for any given size. Check out hobo reels made from PVC.

Wooden hobo reels - whether carved or turned on a lathe - are just plain beautiful. But first, a digression...
At a Renaissance Faire I was once enthralled by a fellow turning chair legs on a pole lathe. He used a living sapling bent over as a spring, sprung by depressing a foot plank. A line connecting the two turned around a pulley on the lathe, and as he worked the plank, spun the leg stock for shaping. 
Unfortunately, it was otherwise a more or less standard metal lathe and, they being generally large and heavy, I hung on to the pole idea but roundfiled the lathe.
Back to hobo reels... one of the vids shows a feller turning one on a home-made pole lathe! OOH... now we're talkin'. It was clear to see that I could dumb his full-feature lathe down to a mini lathe sized for the hobo reel. An hour of cobbling from materials on hand and this is the result:

Ever the Muse brings chaos in her wake!
A bungee has replaced the spring pole.

Stock is skewered between a fixed point (left) and an adjustable point (right).
Two turns around the stock and it rotates around the points.

Never having turned anything, I grabbed a rather funky piece of firewood to try it out. To my surprise, the result would have been a keeper if I'd used better material! On to HR2.0...

Go small, go simple, go fishin'!


My Spice Jar HR left
and Lathe-Turned HR right


*****

A few preliminary tips and tricks...

  • I've found that a single hook (vs. a treble) at the end of a line is easy to stow. Lure and / or bobber can be loop tied (pass a bight of line through a hole and around the item to form a cow hitch) as desired. Hook can be set into holes drilled around the spool base, or stowed in storage cavities with its line pinned by the cap.
  • Braided line (vs. monofilament) seems to work well, is much easier to handle and has enough friction for loop ties.
  • Instead of carrying one or more bobbers, an eye-screw can attach any found bit of flotsam with enough buoyancy.
  • For a bobber, consider a stick which can be thrown much farther than a typical bobber, hook and lure can be cast from a (rodless) hand reel.
  • If using a container, consider one with a pronounced flare (like one end of a spool) toward the casting end. This helps lift clear of the wound line while casting, reducing friction.
  • throat gorge (spine of wood, bone or metal sharpened at both ends and attached from the middle) is far easier to improvise than a hook. A fish swallows the baited stick which then toggles sideways to set. Size for target fish.


Our go-to fishing sources:

Indian Fishing Methods by Hillary Stewart
Living Off the Sea by Charlie White


A Coupla good, how-to vids:


And check out this guy's Rodless Reel!