Please visit our home site at www.TRILOBOATS.com.

Anke and I live aboard WAYWARD, and wrote about it's design and construction at ABargeInTheMaking.blogspot.com.

Access to the net comes and goes, so I'll be writing in fits and spurts.Please feel free to browse the archives, leave comments where you will and write... I'll respond as I can.

Fair winds!

Dave and Anke
triloboats swirly gmail daughter com

Showing posts with label Storage. Show all posts

Saturday, January 4, 2020

Fail Safer Hull Design


All of life is the management of risk,
  Not its elimination.

- Walter Wriston


I have two rules about winning in [...] life:
  1. You can't win if you don't bet.
  2. You can't bet if you lose all your chips.
- Larry Hite


Fail Safer Design for Barge/Scow Hulls

Life is risky.

Every act. Every step. Every beat of our hearts. Every breath we draw entails risk. To go forth upon the waters is in a sense 'unnatural' and carries risk.

Yet we act, walk and run. Our hearts pound and we suck in air. We sail forth in vessels of our own design and build. We live.

We manage risk.

To me, the mantra of risk management is fail-safer.

Not fail safe, which I believe encourages hubris, neglect and risks catastrophic failure.
Rather fail safeR, which I believe encourages humility, continued awareness and involvement with our journey.

Fail safer is a lens through which we can view the design of the hull (in this case, I'll include the decks and superstructures).

Many of the risks to a hull can be reduced at the design stage, and it's these I'll talk about, here.


Structural Integrity

A boat that cannot maintain its shape or watertight integrity in a seaway is on its way to Davey Jones'.

Robust construction - Always a plus, of course. Strongly joined components, especially along exterior angles (chines and corners) hedge your bets. Girder construction backs up and stiffens the entire structure. Consider well bonded girder furnishings and web-frame bulkheads throughout.

Thicker Bottoms and Lower Sides - Impacts with rocks - especially sharp ones - can pierce the hull. Adding material resists puncture. The extra weight is low in the hull where it doubles as ballast. If added to outboard of the bottom proper, its added volume floats its own weight, increasing displacement (if it soaks up water, however, wood approaches slightly negative buoyancy).

Protected Weak Points - In some conditions, a weak point (such as windows) can give before the storm. Shuttering systems with strong closures protect these. Closures, tie downs, dogs, and good storage of loose items are all design options.


Water Management

One of the main jobs of the hull is to keep water outboard. Water's uncontrolled weight - whether on deck or below - is one of the main factors pushing a situation from bad to worse.

Good Deck Drainage - Should green water come up and over the sides, its weight is high on the hull and precarious... like Santa standing on a rocking chair. It can be encouraged by design to drain quickly overboard. Large scuppers (drain holes), open edges, sloped decks, small footwells, inverted or covered dinghies (when carried) and watertight hatches help 'show water the door'.

Midline Openings - In a knock-down, mid-line openings stay as far as possible from the water. Those offset further outboard are that much more likely to take a swig. Companionways, hatches, vents, smokestacks, exhaust pipes and the like are all fail safer the closer they are located to the mid-line.

Secureable Offset Openings - Opening ports, vents, intakes, etc. which are offset from the mid-line can let water in. Consider gasketed, doggable arrangements.

Multiple, Water-tight Bulkheads - Should water get below - via hull breach, a lost hatch, getting pooped, leaks (from above or below), spray... - dividing the hull into separate water-tight areas maintains the flotation of intact sections, which can continue to float the vessel.

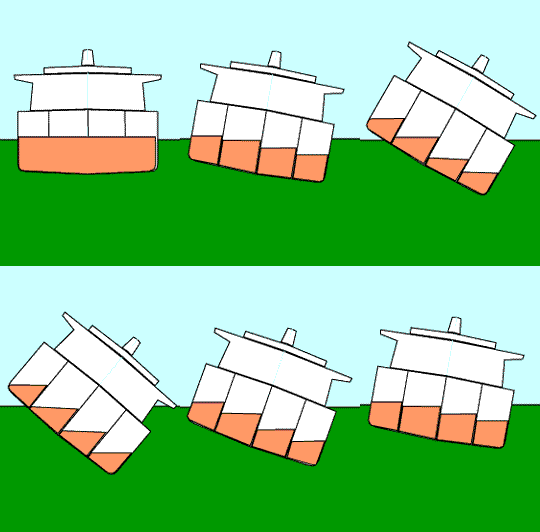
Multiple, Water-tight Longitudinal Dividers - Because...

Free Surface Effect (slosh) is a boat sinker. Loose water or other shifting masses in the hull can slosh from one side to the other, transferring weight plus momentum. This makes a vessel roll dangerously and can capsize it. The cure is to keep it out of the hull when it doesn't belong, and minimize slosh once aboard.

For shallow hulls, this is a particular problem. Where a deep dead-rise hull (V shape) encourages water to remain low in the hull, a shallow hull can allow the free flow across the interior.


Longitudinal dividers, even if open at the top, can help manage this cross flow.

The girder structure furnishings, which contribute to structural integrity, can be arranged to reduce free surface effect.

NOTE: These GIFs from Free Marine.


Stability and Self Righting

The ability to automatically self right from a knock-down is a fine thing. From beyond a knock-down to a roll-over is also fine, but not an essential for most vessels plying inside or 'longshore waters. In looking toward this fail safer feature, consider the use and actual needs of your vessel

I cover this at some length in the post Where Ultra-Shoal, Square Boats Get Their Stability, so will keep it brief, here. 

Low Center of Gravity - A heavy bottom, secure storage for heavy items low in any hull and possibly ballast all contribute to the cause. While many barge / scows do not use any ballast (relying entirely on form stability), it's an option to enhance.

Longer and Beamier - Barge / Scow hulls are naturally form stable (their shape makes them harder to tip over, regardless of ballast). Lengthening a hull adds to its initial and reserve stability. Making it beamier does, too, but if it does flip, wider beam makes it harder to return to upright.

Higher Sides - These add reserve buoyancy, which kicks in later to resist roll-over. They also add to windage and raise the center of gravity.

Inversion-Proof Ventilation - This one, oddly, seems often overlooked. The principle is to create an air-lock when rolled, usually below-decks, between vent(box) and the interior which blocks water from passing from outside in.

A loop of large diameter (dryer?) hose works, or boxes can be arranged with overlapping baffles (the latter shown here). Hose is less compact, but works throughout a tumble.


Sea-going Features

Trailing Lateral Resistance - Most sailing at sea is downwind. As such, an aft area of lateral resistance (skeg, large rudder, board, etc...) aids downwind tracking. Think of the fletching on an arrow.

Strong Bitts - In a storm, lying to a sea-anchor or running with a drogue are vital tactics. But you need very strong bitts with good fairleads. To reliably deploy them. Don't want to be improvising in Force 10!

Secure Deck Storage - When it whumps up, you don't want loose oars, pike poles, dock-lines or other paraphernalia blowing about. Make sure there is a secure place for every item, and that they generally stay there.

Secure Mountings - Things like solar panels have incredible windage. At sea, they must be stowed in very high winds or have extra strong mountings. Plan for hurricane force winds.

*****

In all respects, better safe than sorry.

*****

In designing our own vessels, we have a free hand to nudge the whole toward fail safer. In acquiring a vessel, we can use the principle to guide our choices, and can further modify it as we may.

One last thought... so called safety-in-depth (many layers of redundant fail safers) is a concept used in such endeavors as a nuclear reactor.

I believe in and practice the approach.

Yet to think that we have magically conjured safety is that pride which goeth before a fall. Think Three Mile Island, Chernobyl and Fukushima. All were 'protected' by safety-in-depth design.

The World denies us safety. We are mortal. Human error is our lot. Entropy and what a friend calls 'depreciation' rule with universal jurisdiction. To imagine that we have engineered away the hard chance leads to betting more than we can cover.

Eternal vigilance is the price of freedom!

Friday, December 13, 2019

Hand Tools for the BOATYard

Our two tool boxes, vice and grinding wheel.

We carry a full array of hand tools necessary to build the boat from scratch. 

Timber tools to leverage our options with materials gleaned from beach and woods. An array of fasteners, wire, line, rod, plywood, 1x and 2x stock, aluminum plate and  flat-bar... enough to fix or fudge most anything. Goops, glues, paints and puckies. Enough sailcloth for a whole new suit. Heavy movers to lift, shift and haul the boat. Tarps to work under. 

Everything necessary for stop-gap measures or measured, permanent repair.

-- From BOATYard vs. B.O.A.TYard


Hand Tools for the BOATYard

 I wrote the above a number of years ago, about the distinction between a BOATYard - that 'yard' we carry with us - versus the B.O.A.TYard - The BringOnAnotherThousandYard we pay money to haul out into, somewhere in the Medean bosom of civilization.

Now it's winter and we're cleaning our tools... they look so pretty I thought I'd share.

Here's what we think of as a 'full array' of hand tools.

First, we have a general division:
  1. Small  'Twiddly Box' - This lives easy-to-grab under a companionway step. It contains all we need to handle about 90% of everything. 'Twiddly' cuz it's all the twiddly li'l bits.
  2. Large 'Big Box' - This lives out of the way, but as accessible as possible. It contains all we need to repair our vessel.
  3. Vice and grinding wheel - These live clamped at one end of the (galley) workbench until needed.
  4. Others (not shown) - These include a hacksaw, clamps, crow-, prise- and rockbar, sledge, jacks, hoists and pullers, crosscut and rip timber saws. Bowsaws and axe, Rigging, electrical, paint/glue and spare tools. These would (in theory) let us build a vessel from drift logs.

In this post, We'll take a closer look at the first two

Twiddly Box contents
.
Lessee...
  • Files - Mill bastard, feather, point, 4-in-1 rasp, rasp bits (rat-tail AWOL).
  • Blades - Bad Knife, razor, saber blades for the multisaw (right of tray), utility.
  • Drivers - Slotted, bit driver and angling bit driver with bits, offset phillips and slotted (top right of tray), allen wrench set, slotted brace drivers (lower right of tray).
  • Grippers - Nippers, pliers, vice grips, adjustable wrench, socket wrench and (universal+) sockets and adapters, 'universal' chuck wrench.
  • Miscellaneous - Multi-tool, saw wrest (set), raker guage, Clamptite, step drill set (lower left), knife sharpener, spark plug gapper, mini pipe cutter, zip-ties.


Main Tools

Our main tool box extends the Twiddly Box... we rarely use this one without the other:
  • Files - Mill bastard, feather, rat tails, round. 4-in-1 rasp.
  • Bits - Auger, spade, large twist, small twist drill set.
  • Blades - Good knife, drawknife, chisels and gouge, cornering tool, cold chisel, low angle block and bull-nose/shoulder planes, cross- and ripsaws (Japanese), hack-, coping- and keyhole saws, scraper.
  • Beaters - Carpenter's- and ball peen hammers, hatchet and small splitting maul (not shown... live at wood range).
  • Drivers / Drills - Large slotted (square shaft), long phillips, angling bit driver and bits, 'improved' Yankee style driver (uses bits), 'eggbeater' drill, brace, right angle drill adapter, large allen wrench set, punches.
  • Grippers - Large vice grips, adjustable wrenches, channel locks, tin shears, nibbler, clamps.
  • Layout - Quick- and leaf square, bevel guage, 12 and 50ft measure tapes, plumb bob/chalk line, compass, pencils.
  • Miscellaneous - stud finder, cutting angle guage (both to right of compass), sharpening stones, propane torch nozzle, glass cutter, small prise bar, red cedar for plugs and wire twist for threading, tongue depressors.

*****

Most of the better tools were acquired second hand. A few were bought at full, expensive price (e.g., the bull-nose/shoulder/rabbet plane). Others are lesser tools that only need work adequately once every many years. Yet others are the rare good tool at a reasonable price (e.g., 'disposable' Japanese saw blades.

Between yard and estate sales, flea markets, local and on-line auctions (like Ebay.com), hardware store back alleys and the occasional grit-your-teeth purchase, I'm guessing these tool kits can be put together for a couple hundred dollars or less.

How's your haggle hangin'?

Thursday, January 4, 2018

A DIY Portable Pram

Ken Simpson's CPB-1 Lightweight Folding Pram
Pic from Christine DeMerchant

I love to go a'wandering
Along the mountain track.
And as I go I love to sing,
My knapsack on my back.
- I'll spare you the Fol-de-roos!

A DIY Portable Pram

Many's the time we wish we could haul our dory up to a lake, but swoon at the prospect of lugging our dory uphill and over dale. Or wish for a second ride ashore. Or to float some firewood while we go exploring.

Ken Simpson, a retired engineer of some renown, has some solutions for us.

His site, Portable Boat Plans, offers a number of simple ways to get on the water quickly and have a lot of fun for little outlay. His designs tend toward the minimal, often sacrificing performance for economy and portability. But in the sizes he deals in, the sacrifice is small and the gains considerable.

His Lightweight Folding Prams, CPB-1 (free plans) and updated CPB-2016 (plans available for purchase), are of especial interest.

These two prams are built with coroplast, the corrugated plastic sheet material used for such things as political signs. It is relatively strong for its (light)weight, and, once the edges have been waterproofed, its corrugations trap air for positive buoyancy (it floats). Edges are waterproofed and joined with Scotch(TM) TOUGH (duct) Tape, making construction a snap. Minimal stiffening components are cobbled up from common hardware store items.

The result is a boat which weighs less than 20lbs and stows and carries like a portfolio!

Imagine a fleet of four of these, tucked away on board, ready to be used for kids and other company. As tow-boats for transporting a haul of groceries. As in, "Let's go climb to that mountain lake and paddle around!"

If we pull out all the stops, these might top out at around $100 each. By comparison, a packraft might cost around $600. 

That's a lot of bang for the buck!!


Sunday, December 4, 2016

Q&D Shelves


Wish I had a pretty little girl, 
I'd put her on a shelf, 
Every time she'd wink her eye 
I'd climb up there myself.
 -- Old Joe Clark


Quick and Dirty Shelves

Boats can have a lot of shelves in them, often in odd spaces. Over time, we worked out a formula that  lets us zip 'em out without a lot of head-scratching.

Basic idea is that a (plywood) shelf between walls (dividers, bulkheads, what-have-you) has a support rail attached along its lower, far edge, and a fiddle/support rail attached along its upper, near edge and overlapping the Cleats. 

Cleats are attached to the vertical walls at either end, with room for the support piece to slip behind with a little wiggle room. This locks the shelf against horizontal movement (may need screws if you anticipate tossing them vertically!).

Advantages include:

  • Quick, standardized construction
  • Easy installation and removal (for cleaning, painting, etc.)
  • Flexibility (can be adapted for size, loads, clearances)
  • Uses up a lot of smaller plywood offcuts
  • Relatively easy to go back and rework spacing, if desired (just move cleats)

If you wish to get a bit fancier, the fiddle can be rabbeted along its underside to cover the raw edge of the shelving material.

You can angle the far end of the cleats to a point... this allows the shelf to be lifted upward as if it were a lid, rotating around its far edge in contact with the points, until the support face fetches up against the angled cleat end (the sharper the angle, the higher you can lift the shelf). This can be useful in tight spaces where you need a little extra room to un/load the space below it. For example, a tote that fits snugly may need a little extra to clear fiddles and such along its near, lower edge.

We found that our locker openings don't let us insert full length shelves. We ended up cutting this type in two, mid-length, and putting a lip under one of them along the cut. A short, rabbeted piece is attached to the back wall, rabbet up, straddling the cut (also with a little wiggle room). The lipped side needs some support at the near, cut corner... we use twine attached to the next fixed point above it, rather than build struts. This approach has been much easier than installing a divider, and doesn't break the run of shelf length.

An idea to shelve away!


*****

Bonus Tip:

Can't recall where I read of this, but could well be The Sailor's Sketchbook by Bruce Bingham, under 'removable fiddles'.

Another simple locking device is to make pegs that fit into matching holes. These can be made of wood or metal.

One cool way to do it is to drive a (bronze) screw in the peg location, burying the threads but leaving the shoulder exposed. Hacksaw the head off and smooth with a metal file to leave a protruding peg. Put the piece (shelf, removable fiddle, table, etc.) in place, over its supporting surface and tap over the screw with a hammer, denting the receiving surface with the exposed peg. Drill a (slightly loose) hole at that spot. If everything is done reasonably square, the peg slips into its hole, forming a sheer lock, preventing horizontal movement.


 Bonus, Bonus Tip:

A recent brainstorm is to use heat to flatten and shape PVC to form springs. A hole drilled through the PVC to match a peg forms a lock that can be released (sprung off the peg) with gentle pressure.

Works for door latches, removable step locks, drop down bin locks, hatch locks... spring shapes  and applications are limited only by the imagination!.

You can find lots of info on shaping PVC through sources like this one, drawn from the way-too-cool world of PVC bow-making.

Saturday, February 6, 2016

Footwear's Footprint: Problems and a Solution?

Tire Sandals.

From Thomas J. Elpel's Primitive Living Skills
Article contains tire sandal pattern and instructions
 

Sell a man a boot, you boot him for a while.
Teach a man to boot, you boot him for life.

-- Ancient Chinese saying, sort of 

 Footwear's Footprint: Problems and a Solution?


As coastal cruisers in temperate climes, we are oppressed by our mountain of footwear.

Here's our current list by type and purpose; 
  • Rubber Boots – Edge-of-the-water and wet hikes ashore.
  • Leather Boots – Longer, more rugged hikes.
  • Hip Waders – Wading for repairs or thin water maneuvers... chest waders would be nice, instead.
  • Winter Boots – Insulated for cold weather sailing or snow ashore.
  • Sandals – In and out of water in warm weather... good soles allow doubling as street shoes.
  • Slippers – Sheerling for lounging and fair-weather sailing, while high soles allow short, wet deck excursions.
  • Snow Shoes – Snow and occasionally mud.

Times two! Sheesh!! This adds up to a bulky heap o' gear.

Shoes get a lot of wear and tear, and replacing them adds up, over time, to a pretty penny. 

If not given prime storage, they tend to mildew, no matter how well cleaned.
Our vital rubber boots, in particular, only last a few seasons at best... we face a choice of carrying a spare set or patching (mixed success) until pulling into a town for replacement. And over the years, they leave a trail of unrecyclable garbage. Can sometimes cut them down to 'garden loafers' and pass out to friends, but most of them are doing the same, themselves.

My hip waders are heavy rubber whose tops fold down and up again, like old-fashioned sea-boots (this makes them near impossible to use with pant-style raingear, and a short rainjacket doesn't cover their tops). While I like them in dry weather, they are too heavy and expensive for general use. Anke uses a lighter set, but they're still not economical for frequent use.

In general, we go for robust treads for afloat/ashore use. Not for us the sliced sole, deck-gripping yacht tread... they just can't cope with a slimy rock or mossy log.

But I've come across some ideas that might help reduce our footprint.

Leather has some distinct advantages, with DIY potential.

Well made, maintained and oiled, leather boots are reliably waterproof. Irving Johnson, in Around the Horn, reports that professional sailors preferred leather sea-boots to rubber. Apparently, they kept feet warmer and overall dryer. I'm guessing it's because rubber doesn't breath, and feet are soon dampened from condensation, even on dry days. 

Boot leather is tough stuff. We wear out our resole-able rubber treads, but the uppers just keep on going.

A friend directed me to this brilliant idea: 

Make DIY sandals from old tires. Add a moccasin. Add good socks. Go. 

This system has been reported to be extraordinarily comfortable on thousand plus mile treks in rugged terrain. In our case, we'd be looking at boot moccasins (or moc + tall, waterproof socks?). 

It's a modular system (my favorite), which confers high versatility. Each component can be used separately or in combination. The sandals provide solid, sure, cheap soles to the boot mocs, while the socks layer up to moderate weather.

In our case, we would need the boot leather to be selected, treated and built for waterproof service. At best, waterproofness is pursued from the tanning process on. 

To this basic system, I would like to add a roll of light, water-proof or -resistant fabric to the boot top. Waxed cotton, for example, dampens when immersed, but will not flood through. It would normally be worn furled, but could be unrolled as hip-waders. This avoids the weight and volume issues of folded leather. Having them always available would be a big asset. 

Insulated overboots from sturdy fabric for cold-weather can be DIYed, again using the sandals for soles. Weather cold enough for insulation is generally dry. With care, these can be used ashore. With luck, the overboot could double as a lounging slipper?

In-soles are a low-profile accessory. Wool insoles provide cushion and insulation from the ground without over insulating the foot above. Specialized insoles increase shock absorption. 

The only sticking point is that, while moccasins are easily made by the home craftsperson, waterproof moccasins are not (they can be DIYed, but it's skilled work). There are a few professionals who offer these, custom made, but they cost considerably more than one normally expects to pay for common footwear. 

Still, I'm guessing that a custom crafted boot moc will pay for itself with decades of life if faithfully protected by the sandals. We waffle, but my guess is that this is one skill we'll not acquire unless forced by circumstance.

If this works, we'd be down to the modular system and snowshoes... 

That's more like it! 


Sunday, May 3, 2015

Hermit Crabbing: Another Way to Go


Hermit Crabbin'
Prints available HERE

The ideal is to feel at home anywhere, everywhere.
- Geoff Dye


Hermit Crabbing: Another Way to Go
How Michaela Poppleton aka Mimi P rolls...

Over at VolksCruiser, Bob Wise asked his readers what we would like in a VC. Among the responses was Mimi P's alternative approach, Hermit Crabbing. Michaela Popperton, the woman behind the netID, graciously expands, here, on her comments.

The beauty of the HC approach is that one can sample from the smorgasbord of possibility - both in sailing grounds and types of vessel - without the heavy investments of time, money and energy that a fully found vessel can consume. Yet one is much more connected to one's time aboard than in, say, a bareboat charter. Such kits are scalable, and can be personalized to many styles of cruising, ranging from open beach cruiser to trade wind sled.

Just find a shell!

The following is her lightly edited account, reformatted from our correspondence...
.

Bio

I'm just about to turn forty-four years of age, was born and raised in and around Toronto.  I studied architecture in university but never pursued it beyond that, becoming rather turned-off by the profession's narcissistic self-obsession... which is pretty ironic seeing as I've ended up in the middle of all-things-yacht which is about as self-absorbed as it gets.

I work in the marine biz, so I have a sort of love-hate relationship with boats.  It's a career that has afforded me some great opportunities to live in lands far-away, but it also sometimes takes the fun out of doing something as simple as going sailing; there are days when the last thing that I want to do is deal with another boat. even if it is my own!  I'm shore bound for a while right now, so hopefully that will help to rekindle the passion; to freshen the breeze, in a way.

I've sailed all my life, raced much of it, and being a natural tinkerer I got involved in production yacht building with the late PDQ Yachts in the late nineties.  I started on the shop floor fitting joinery into the boats, but between having a pretty solid boating background and being pretty bright I quickly moved into a role managing (ack...) the existing and in-development sailboat lines, and eventually ended up in a role as the president's right hand and acting as a sort of liaison between the engineering, sales, and production departments.  
[I'm now] acting as [...] liaison between a customer or marketing group, a designer, builders and a boatyard.  The customers know what they want and the designer knows what it should be.... then I figure out how and what it will take to build it, and then convey that to the hands in the yard.  It sounds pretty glamorous, and sometimes it even is.... but it's mostly a lot of drudgery penning specifications, populating bills of material, and schedule building.

I've built on the beaches in Thailand, in the furnaces of Taiwan, up the river in Argentina, aside the Broads in the UK, down the Eastern Seaboard of the US, and most recently in sunny, breezy Western Australia.

I took to living aboard out of economy more than anything else.  I could afford to keep a home or a boat, but trying to keep both was going to be a stretch... so I chose the boat.  Doing the kind of work that I do, one or two or three years at a time, demands that I be flexible, unencumbered, and mobile; this is reflected in my hermit crab style of boating, and living.  

The Hermit Crab Approach

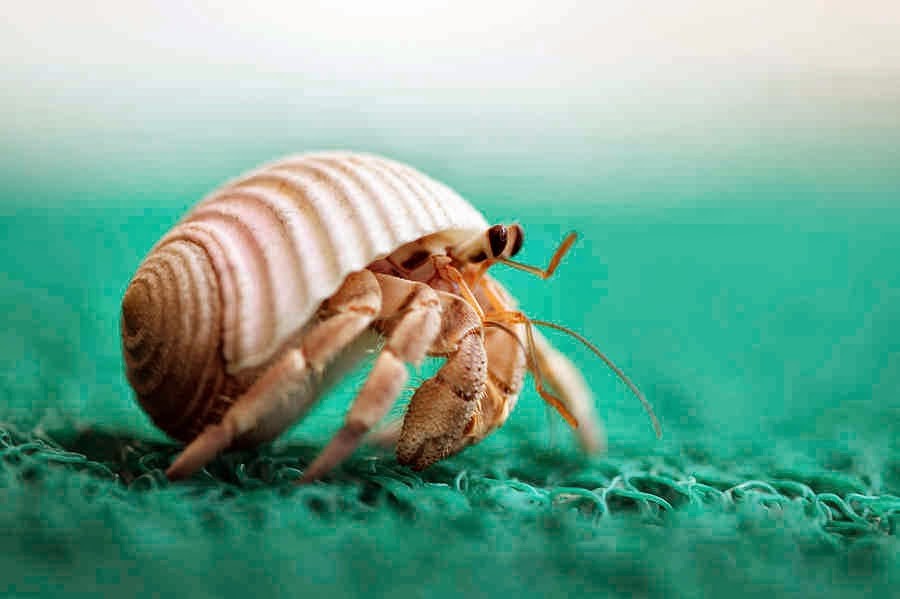
I've taken [...] a cue from the hermit crab.

I have a small collection of good "stuff" that I take with me from boat to boat as my situation or locations change. Everywhere in the world I go there are countless almost-retired hulls waiting shoreside for me to move in, and they are generally of a type that suits well the local waters. It is easier, and less expensive, to pack my kit in a crate and ship it across an ocean than it is to forever keep a boat that has passage-making capability that is only occasionally used to advantage.

Essentially, it's a collection of decent and useful gear that I've collected over the years, some of it purposefully bought and some of it scavenged, that lets me move onto just about any boat in the twenty-five to thirty-five foot range without that boat having to be already well fitted and maintained.

It allows me to use (just about) any of the countless, long-forgotten hulls that litter the marinas and yards all around the world.  I have been involved in the construction of so many of them... an enabler, in a way... to the wastefulness.  It bothers me, so I find some joy in giving them even a brief bit of care and extended usefulness.


The Boats

None of them are going to be up to making long passages, so I don't get too attached to them and happily leave them behind when I need to move some place new.  Cost and effort to restore or renew any of them would be highly unlikely to be recovered, so I minimize my investment: easy-come, easy-go.

I actually put very little effort into any of my own boats, because it's the sailing that I love and not the boat; it's about the wind and the water, not the gadgets and brightwork.

When it comes to choosing a boat, I usually let the location do much of the deciding for me.  They never need to get me very far from where I already am, so those qualities that make "great cruisers" don't necessarily need to be paramount; it affords me quite a lot of flexibility and freedom.

The estuaries in the UK really cried out for a shallow-bellied, tall-rigged bilge-keeler (which was wood, and so full of rot that is sort of "oozed" over the waves!), while in Fremantle I made the most of the perpetually-gorgeous sailing conditions and picked up an older generation lightweight racer that wasn't great to live on, but absolute bliss to sail.  In Toronto I had a C&C Redwing 30 and a Niagara 30 at different times: very different boats, but both had decent headroom which made winters bearable.  In Argentina I spent the most out of any of them when I found an old German Frers IOR warhorse and proceeded to regularly get it stuck in the mud.  It was quite enjoyable to actually meet him at his home, and tell him the story ; )

I like boats that have histories, and stories.  When they're shiny and new and washed everyday they seem "silent" to me.  None of them have been over ten thousand bucks to buy, and generally they have been around five or six.

Reselling at the end is the hard part and could take forever, or even never happen. Having put little in I really don't need to get much back out so I cut my asking price right down to a few thousand dollars and someone usually jumps on it.  People are far more likely to buy an old boat that is the in the water and being used than they are a boat that has been sitting dry for years, or decades.  I look at what I spent as my rent for the duration, and my return covers the expense to move me and my gear to the next place.


The Kit

I got tired of always dealing with engines and old outboards, so I bought a shiny new 6hp Yamaha one day when I was feeling plush.  It is a little undersized at times, but the weight savings compared to the 8hp models is enormous and lends me confidence when I'm hefting it on and off of mounts, and it saves 15 kilos worth of freight each time I move.

I have a collection of plastic UN-approved and sized 20L jerry cans: two red for petrol, four blue for potable water, and two white for anything else.  This way I don't need to rely on integral tankage, and having all of them of equal and manageable size allows them to stack beautifully.  I made bicycle panniers that hold one can each side, but I fit them to whatever bike I find locally.
I have a galley box with all of the essential utensils and implements, and a single-burner MSR multi-fuel backpacking stove that happily runs on the same gasoline as the outboard, so I only need carry one type of fuel.  I have a collapsible charcoal grill at the moment as well, which generally (but not always!) gets used shoreside and sometimes with foraged wood.

I use a Sawyer gravity fed water purifier when needed.

I'll probably add a composting toilet at some point, when I come across a boat that doesn't already have something that is make-workable.

I have a hefty Whale portable manual bilge pump that so far has (luckily) been used for everything except pumping water out the bilge.

Electrical systems are the hardest part to generalize and need to be dealt with individually.
Individually rechargeable lights are always a great solution, though more often than not I manage to cobble something workable together with what's already there.  I have considered building myself a box-mounted distribution panel and harness "octopus" that I could move from one boat to another (there are really only a couple of layouts used in sailboats in this size range, right?), but again, I've not yet run into a situation where what was already there was a completely lost cause.  I like making what I have, work.

I bought a used Watt & Sea hydro-generator from a guy who was disappointed by its performance (expecting miracles, I suppose...) and that has proven fantastic as a source.  I take the moorings that nobody else likes because they are in a high-current or -tidal flow, and it happily spins out watts all day and night. I really like the fact that it encourages me to sail more.  It starts putting out current at less than two knots of flow, but really shines when it has about five... so that does create a practical minimum waterline length on any potential hull.  It is also pretty pricey...   

I've also got a roll-up solar panel that is useful at keeping the anchor light working when I'm away from the boat, or keeping the cell phone and stuff charged.

The hydro-gen comes with it's own controller, as does the solar panel.  I let them both operate independently, but it is rare that both are ever used at the same time.

All of my navigation kit (software, GPS, etc) is laptop based, and I have both wifi and cell boosters.  The cell booster isn't completely universal, but has worked fine over my past few locations.  It probably seems extravagant, but my data plan is my connection to the world and lets me work on contracts elsewhere; it's a necessity for work, not for living.

I have an old-but-oddly-reliable Simrad tiller pilot as my extra set of hands, and I generally have enough electricity from the hydro-gen to run the pilot and my laptop while sailing along and working from the cockpit all day; I reach off in one direction in the morning and then come about and reach back in for the afternoon.  Life is good sometimes : )

I use handheld compass, GPS and VHF, but mostly as a safety tool in the event that I go MOB so they are always stashed in my PFD.

Tools... Of course, I've got an assortment of the usual hand tools including fids, needles and a stitching palm that lets me keep old rags useful and earn a few extra bucks when I need to.  There is also a bunch of useful bits of rigging that I always take with me, ranging from shackles and blocks to cordage and tape.  I organize it all in canvas bags inside of appropriately sized buckets, which are always useful to have on hand.

I don't have anything too crazy, partly because I work in and around boatyards so a few bottles of beer and big blue eyes often get things "done" for me.

I have two Japanese-styled handsaws, because they are light and break down into very little space.  I like to whittle, so I have few knives and gouges and rasps.  Spanners, sockets, screwdrivers, allen keys, side cutters, linesman's pliers, caulking gun, rubber mallet, hatchet, sand paper, paint brushes, scrapers.  The outboard came with every tool that is needed for user-servicing.  It usually all sits in a bucket.

None of it is interesting or exciting, but on a boat that doesn't have too much, not much can go wrong nor needs to be fixed.

I avoid power tools, because the electricity common to each of these places varies.  There really are very few places where 110-120VAC is used in the world, but I'm still hesitant to commit to 220-240VAC tools (adapting two available 120 receptacles to one 240 line is easy enough) even though I don't have a really good reason why I haven't.  Aside from not having had to yet....  Toss in the differences in frequency, and the chargers of cordless tools get even more limiting.

Fasteners and adhesives... Ziplock baggies full of new and reclaimed screws, bolts, nuts, and washers.  In bags they all cram down into a very small space and are worth shipping especially after an Asian stint.

Fibreglass is very easily available so I don't bother, and resins have a very short shelf life so they really shouldn't be kept.  They would have shipping issues as well, I suspect.

I've always got a tube of silicone and a tube of not-too-adhesive bedding compound on hand, because old boats leak.  A lot.  I don't ship any of it.  I suppose I could figure out at which point a product becomes a candidate for saving and shipping based on weight, but I tend to look at it as partial tubes have such a short life that they aren't worth going through the hassle of listing, declaring, and proving safe to ship.  I'm really good at giving things like that away to the next guy.


Shipping the Kit

I don't have a preferred method of shipping my gear, instead trying to make the best use of carriers and agents that we're already using at the boatyard.  Using local shipping agents also lets my little and relatively light pallet ship as part of a full consolidated container, though that sometimes means that things take a bit longer to get back into my hands at the other end.

I often use an empty pallet and crate from an engine because they are sturdy and light, and let the customs agency that has been getting all of the boat building material into the country figure out how to get my stuff out. I have always had easy access to crates, so I've not thought much about what it could be if I were to want it to be reusable. Maybe a two-piece dink could be designed to close like a clamshell with everything inside....

It is always surface-shipped, as none of the previously fuel-containing articles can be shipped by air.  The same is true of lithium batteries in many cases, so that needs to be kept in mind.  
My most recent shipment coming back to Toronto from Perth had a bunch of clothing and "stuff" and weighed in just over 100kg crated and took about a month, door-to-door; those two points are just about as far apart as is possible on the globe....

General Thoughts

I think a camp cruiser kit is quite viable, with thousands of twenty to twenty-four foot boats out there to be had wherever you might be or want to go.  There were so many of them built and they are easily and inexpensively had that buying two just to merge them into a single, slightly better one is an option (especially with scrap lead selling for over a dollar a pound so the discarded keel might help finance other parts of the project).  Camping gear is readily available, and so long as one doesn't fall for the marketing it can be very affordable and all fit in the trunk of the car or a broom closet at home.  Maybe an all-in-one kit box that is freight-company-acceptable might be marketable?

Languages!  It makes things interesting, that is for sure.  I used to work really hard to learn the local language, but have found that most of the official entities and port authorities have provisions in place for dealing with English-speakers.  Learning the indigenous language makes my day-to-day life of shopping for vegetables and underwear a lot easier, even if only because I am trying and the locals appreciate that.  As far as work goes, I tend to deal largely with fairly well educated people and they have long known that being able to communicate in English is invaluable, so it has made it easier for me.  Sometimes, though, there is merit in keeping my mouth shut, my ears open, and my comprehension secret....

To Sum Up
Advantages to the way that I approach life afloat?  Two advantages, and two reasons:

(i) The biggie:  It gets me on the water wherever I might be quickly, as I usually don't have to build or repair much of anything.  I hand over an envelope with a bit of cash, shake hands, check the through-hulls, paint the bottom and go.

(ii) The fun:  It lets me pick a boat that suits the waters that I will be in and the type of sailing that I will be doing, even if that might sometimes be dock-bound.  I can afford to be a bit frivolous and try out something different if I want to because I'm not overly invested of time, money, nor sentiment in the boat itself.

(iii) The peace of mind, on a professional level:  I'm holding myself accountable for the part that I have played in creating the mess... the wasteland of forgotten dreams... by quite literally living with and in it.

(iv) The right thing, on an environmental level:  The most environmentally-friendly boat choice (at least as it relates to construction) is one that has already been built.  I'm not making anything worse.

*****

Clearly, hermit crabbing is not for ‘all the people, all the time’. But it’s something to keep in mind when opportunity arises over some far horizon.

It’s a way to see some more of the world, accumulate inexpensive education or establish a base along any sea.

The possibilities are endless....

Monday, March 23, 2015

Form Follows Function: Comparing Bottom Profiles

Comparing two possible Triloboat hulls on the same footprint, plan and layout
Both deadflats end on bulkheads


I'm not bad, I'm just drawn that way.
- Jessica Rabbit

Form Follows Function: Comparing Bottom Profiles

Anke and I are building our new boat to the lines of the upper model shown.

It's the shape I typically draw for Triloboats - 1/4 aft + 1/2 deadflat + 1/4 bow - each given as a fraction of Length Over All (LOA).

This distribution maximizes interior volume and overall displacement, as well as rectangular storage areas. The long deadflat produces fully right angle carpentry throughout most or all of the interior, simplifying carpentry. It carries extra initial and reserve buoyancy at the ends, which dampens pitching, and makes the ends less sensitive to weight loading.

Of especial note, in this layout, the weight of the trunk cabin and contents of the large, under-the-cockpit hold (some may even have an engine in there) has more floatation in its vicinity. This allows heavier stuff to be stowed where the stowin' is good.

But it's not the slipperiest shape availbable to a box barge/scow.

The lower model shows a roll-up bow. This won't plow water when plunged into it, so doesn't slow the boat as much as the transom. If driving forward through water, the angle drawn (one among many) will develop kinetic lift. Cost is less reserve buoyancy (which helps lift the bow in short, steep seas, regardless of forward motion), and cuts some useful volume away (from, say, an anchor well).

The lower hull has had some of its underbody pared away, resulting in a hull that is easier to drive through water. Of the two, this should be the faster hull.

Its deadflat has been reduced to about 1/3 LOA (adjusted to land on bulkheads; not shown). This affects both bottom end curves, lengthening and 'easing' them. They are somewhat easier to construct, possibly avoiding the need to kerf. More importantly, they offer less resistance to the water, as it flows along the hull.

Lost volume is likely negligible, but lost displacement may cost you your collection of vintage bowling balls.

These changes drop roughly 2000lbs of displacement. Assuming all else is equal in terms of rig, gear, crew and outfit, that's 2Klbs of payload that comes out of your elective stores.

Depending on how you cruise, this might be a good trade; stuff for speed. After all, the barge/scow hullform - compared to many others - has carrying capacity to burn. It may well be that you can spare it.

Anke and I sail with a lot of food, tools, spares and books that see us through long spells between resupply. But most folks don't ask that of their boats. Instead of years, they're out for months, weeks, days or even hours. That 2Klbs is superfluous to the way their needs.

Of course, one could go to fully rockered bottom (no deadflat), and ease on down their road.

Both of these models are fairly well balanced, meaning that they should float fairly level, all things being equal. But other arrangements may not. For example, we use the upper forward and lower after end. The bow would then be buoyant, relative to the stern.

Not a problem, up to a point. In lading the vessel, we'd want to pay attention to weight distribution for trim. Heavy stuff amidships, and tending further forward than aft. Low and secured, as always, of course.

Point is, our needs lie along a spectrum. What shape we choose for our hull reflects how we see ourselves faring. And to shift the simple options of the box barge/scow isn't rocket science, but simply redrawing curves. Look at it from every angle you can think of... but you were going to do that anyway!

So, if you purchase one of our StudyPLANs - typically drawn with the higher capacity lines - please consider it but a starting point.

Remember the words of the late, great Dynamite Payson...

"If it looks like a boat, it'll pretty much act like a boat."

...and take up your pencil and play!