Please visit our home site at www.TRILOBOATS.com.

Anke and I live aboard WAYWARD, and wrote about it's design and construction at ABargeInTheMaking.blogspot.com.

Access to the net comes and goes, so I'll be writing in fits and spurts.Please feel free to browse the archives, leave comments where you will and write... I'll respond as I can.

Fair winds!

Dave and Anke
triloboats swirly gmail daughter com

Showing posts with label Thrift. Show all posts

Monday, April 13, 2026

Guest Post: MARY H by Chris George


MARY H
All photos supplied by Chris George


Lord, it was day and night and night an day work when in season!

- Some Old Salt


MARY H
  Guest Post by Chris George

In 2022 Massachusetts announced a small business grant for Green Innovation and Climate Resiliency in the commercial seafood sector. I won the grant and built a scow for my shellfish farm. Having read the Triloboat Blog for years, I had formed the idea that a sailing scow could be useful. The book Trade Winds by Christiaan de Beukelaer implanted the idea of using sail, and maybe electric, to power my work on the farm for climate reasons. The idea was born and I received $25,000 to build and work the boat. She is named the MARY H, after my wife, and her mission is to carry and deploy aquaculture gear and pick up oyster and quahog seed and drop off harvests to a hatchery facility about one mile away across part of Cape Cod Bay.

The design already existed in Howard I. Chapelle’s classic American Small Sailing Craft as the Cape Cod Bay Pound-Net Scow. In the old sailing days, these boats mainly fished herring - and fished the species out! They look like the TRILOBOAT StudyPLAN SANDBOX, but evolved slightly curved sheer lines helping with the “roll to the sea, as there often is on the Cape shore” and historically carried a pile driver. I sent to the office of ship plans at the Smithsonian and for $60 they sent me a tube full of diagrams of old scows -including Great Lakes types - along with Chapelle’s lines, taken off in Provincetown in the 1940s. To start I had Dave’s blog, Chapelle’s book and an awesome picture I found on the internet of a model built locally off the same plan, credit Rob Napier. 

The original boat in the plan is 36’ and I determined for the scope of the project, and town mooring regulations, to scale the build to 20’ - though I did wonder if proportions would get weird later on. So off this poster-sized plan I made a table in my notebook with an engineering ruler and scaled all the points of measurement for 20’. I also set about making an 8’ mock up with a couple scrap veneer plywood sheets and a cardboard model. Making the model was fun just tracing the plan onto cardboard and adding a chopstick mast and paper sails; at that size my old G.I. Joes look like a person of 5’4’’ height. 

To build the boat I had written some pay into the funding to hire skilled help. I hired a friend of mine, a retired roofer and now bricolage artist with whom I had already worked on a few building projects. The first thing we did was to locate a tree for the mast and let it cure for about a year. It’s a beautiful mast! We found a very straight white pine of about 24’ in the woods on a neighbor’s property. Stripped it with a machete (held like a spoke shave) and then coated it with wood preservative and hung it in my garage. 

Severely squeezed into my garage, the actual assembly and building went straight down the lines of “Instant Boats.” Dynamite Payson virtually dictated the techniques that I would modify. Cutting out the main pieces from plywood was most of the early work. I referred to the notebook table a lot and because the math was simpler to convert inches in decimal (remember the engineering ruler), I made sure to make an extra column for the conversion back to 1/16th inches for my measurements on plywood, transcribing the height of the sheer above bottom. The one caveat is that this measurement required another column in the table because the Pythagorean theorem had to be applied to account for the flare of the hull as the Chapelle plan just shows a profile view. No lofting though! A Kreg brand T-square was used constantly. I made a useful misstep while building the mockup that helped me realize to account for flare because I paid a printer to just proportionally enlarge the plan and I used it like a template. When assembling the mockup (which I may still employ as a standup paddleboard) using stitch and glue with zip ties, it felt scrunched down. This effect was not noticeable at the tiny size of the model. The actual cross section of MARY H is 5’ across the bottom with a 5’6’’ beam on deck. 


The winter months were spent in the garage with a space heater cutting and edge joining the plywood with epoxy and fiberglass. The gunwales were constructed in this way as well as five transverse bulkheads for holding the structure together like a ladder. Striking the fair curve of the bow and stern were the most ancient and nautical feeling part of the process. It was accomplished by laying the measurements on the plywood with nails and bending a piece of PVC edging around them. The curve was hand cut by eye with a buzz saw through the skill of my roofer friend. 


Building a boat was a lot to ask of my family, three children and one an infant. I did a lot of work after bedtime into the night and tried to involve the children as much as possible. One problem spot occurred while attaching the bottom to the sides for tape and glue. We decided to attach the bottom with the boat upright, bending the kerfed bow and stern up with shims and two-by-fours at both ends. The shape of the boat would be held in place for gluing with bar clamps and screws edgewise above the waterline. The deadflat was easy enough and all joints were bonded with epoxy fillets and fiberglass strips. But the ends had to be done in one fell swoop laboriously levering up the ends of the boat like flaps over the piles of shims while running around to make everything even as sealant set between the seams. We went way over time and things were starting to fail as my wife pulled in with all the kids. Seeing them all it was such a sacrifice not to be able to care for my baby at that time. But I left it in the care of my friend and somehow he finished the bottom single handedly. 

With the hull still upright I built the centerboard box up out of clear pine boards and more marine plywood, splurging on bronze screws. Now looking boatlike, I got a group of friends together to help flip the hull over onto its transoms for sheathing the bottom. All were promised fresh clams or oysters. I sheathed the entire hull on the outside only with one layer of thick fiberglass cloth bedded in epoxy. Once painted the same crew helped me flip the boat again onto a trailer which I picked up reasonably from the USACOE via the GSA, a good resource. The garage doors were popped off the hinges and the boat was carried out by hand. I had lined the trailer with an old foam mattress that I saved for this purpose so she would have a soft landing onto the rollers. 


Outside in the Spring I built deck stringers out of clear pine strapping and built the mast step of extra fir from the skeg. The boat was filled with 100 empty soda bottles for buoyancy with some sealed plastic water cooler carboys for good measure. The deck was cut from the same ½’’ marine plywood as the rest of the boat and laid as efficiently as I could manage. Between every seam I shot marine sealant or sometimes silicone caulk. A somewhat big mistake was not better sheathing the deck somehow because it leaks during rains. It has to be pumped out after rain and storms now while on the mooring. The hull is tight however so the water inside is “fresh.” One splurge was for EVA foam faux wood decking. Rolls of this stuff were moderately expensive but are a big facet of the historical look, and napably soft. Many people have stopped by the boat and remarked they thought these were actual planks. Rub rails are made of super cheap highly sacrificial lengths of furring strip.


Rigging is piecemeal. I got about 100’ each of tan synthetic rope for the halyards and great thick faux hemp nylon rope for the main sheet, also a historical touch. I made a forestay with hardware store steel wire and shackles. Chafing gear is cut garden hose. The sail was made at a sailmaker in Falmouth, Massachusetts. The proportions are kind of weird as the boom is a real deck sweeper. It will help to reef when I sail the boat more in earnest. At this point she sailed down wind, in the lightest winds three times in the Summer and Fall of 2025. Yet, when I put the sail up, down wind, in the lightest wind, it is still hard to deny we are under sail. And that feels great! I am looking at a potentially life long learning curve so there is plenty of time to perfect it. For electric propulsion she hangs two five horsepower German Torqeedo engines off the stern with some Chinese ePropulsion stick engines for backup.

MARY H now sits on the hard waiting for the 2026 season coming up at the end of March. All the people who helped were essential: a landowner letting us search for the mast, friends and relatives who flipped the boat or shot screws or gave friendly advice, authors - I owe them all a ride or at least some oysters. Spiritually, there have been few journeys as rewarding for me as building this boat. At the Christening, the bottle was smashed by the real Mary H.


Expenses

Dave, here. Chris provided his cost accounting under the grant in response to requests in the comment section. His itemized list can be read HERE. Please click on the spreadsheet image for a more legible pop-up.



Tuesday, November 18, 2025

Live Aboard MacroEconomics: A Case Study


WAYWARD earning her keep


As you live your life aboard a vessel, be aware of the sea of life on which it floats and on which it moves forward.

— Ian Gardner (as remembered)


Whatever floats your boat!

-- Sailorspeak


Live Aboard MacroEconomics: A Case Study

LUTRA, the boat we're currently building, offers an as-of-today set of numbers to puzzle over.

Numbers, of course, are slippery li'l devils. What counts in or out? Round up or down? Will the future hold the course? Nonetheless, it's worth a look! Here, I'll take a bird's eye look at up-front dollar costs of our live-aboard vessel relative to rent. 

So LUTRA. Our labor is 'free' (ha!). Time is probably about 6 months of steady, optimal workdays... spread across a year and a quarter in our actual context. Let's say 3000 person-hours (2 persons x 8 hours/day x 180 days, rounded up). The time investment itself hurts less than time lost cruising at large!

When all the dust settles, we arrive at two figures for her out-of-pocket cost. For building site, construction and materials of the hull and furnishings, around $5K is pretty close. Mind you, this is still semi-remote, so costs are high. That's the easy part.

Where it gets complicated is in evaluating outfit, gear and copper we're carrying forward from WAYWARD (and earlier boats!). 

WAYWARD's copper plate was originally a whopping $10K in 2014 dollars. We figure that it paid for itself in about 5 years, saving a rugged alternative finish (e.g., fiberglass/resin), anti-fouling paint, haul-outs and associated costs, repairs, on-board insurance, etc.. After 10 years aboard WW, we used half of it and her chine angles for LUTRA.  Each half is worth around $4K as #2 scrap in 2025 dollars defraying the original outlay.

Similar calculations go for anchors, chain and rode, a pile of fasteners, piano hinges, coms, nav lights and other gear.

So... um.... I'm going to say $1K for these components. Neither replacement value nor market value, but a nod toward what might have been an expensive heap if it hadn't already paid for itself. 

That brings LUTRA's up-front dollar cost to ~$6K.

We're building in our home port of Tenakee, Alaska. Currently, property is well out of our reach. Rents are running around $1K/month for a studio-ish space, utilities included. IF you can find one open. There are only a handful and chronically occupied.  In a larger town, such as Juneau or Sitka, low-end rents average $2K - $2.5K/month, utilities NOT generally included. Tight there, too, but there're generally more openings coming and going.

So let's start with our local $1K/month. That's $12K per year. LUTRA's build is paid off in 6 months at large, a little more when tied to the dock. If we live-aboard for 10 years, we clear 'savings' - in dollars not spent - of more than $100K in village rent, ~$200K in town rent!

Cash money, unfortunately, doesn't grow on trees. 

Tenakee labor is compensated at $18 - $25/hour. It's not exactly 40 hour work weeks, so can also stretch wider over time. But let's say 200 person-hours ($5K x 1 person-hour/$25) to earn the $5K cash outlay for LUTRA. Let's add to that our 3K person-hours for construction and round up for a conservative 3.5K person-hours.

Still, it's easy to see that 10 years of rent would require at least 4K person-hours at present rates.

So... well, well!... looks like we save time, too, even when calculating the bare rental alternative to living aboard. An even better dollar deal if we had bought a vessel, rather than DIY.

That being said, while DIY construction plays a role in all this there are middle grounds.

Buying a modest fixer-upper and DIY from there will (most likely) drop your time investment considerably, and quite possibly your layout costs, so give that a good look.

But the big money is in living aboard! Sail away from the dock if you can.

***

In reality, all of this is vastly more complicated. We don't begin to examine, here, the costs of gainful employment (commutes, clothing, peer outings, etc. inherent in the alternative). We haven't calculated equity and resale value vs. zero for rentals. We don't know how to count our time entangled in town while building. We haven't considered costs of maintenance and repair. We don't know how to evaluate what we learn while building, and how that pro-rates over the years. We don't know if we'll get that 10 years ahead, much less the 20 or so we have fair reason to hope for.

We keep in mind that, at the end of ten years, we still own our vessel  / home ; it's just another rent-due month for the alternative.

I started this post musing in print. I'm pleased to see that the numbers appear to crunch in our favor in both money (I was pretty sure) and time (surprise!). My sense is that, given a simple, low-overhead lifestyle, living aboard and sailing remote, the numbers tilt even further in our favor.

So don't let a little thing like money stop ya!


Tuesday, September 9, 2025

Tulle + TBIII + Paint: A Promising Sheathing Combo


Save that Veil...
It's Tulle!

Because, in your dreams, every detail matters.

- Wedding Veil Ad Copy


Tulle + TBIII + Paint: A Promising Sheathing Combo

In our endless search for cheaper solutions to common problems, we seem to be closing in on a minimum. Specifically, in regards to a plywood sheathing system.

Previous posts - More Than One Way to Sheath a Boat and Deck Sheathing: Alternatives to Fiberglass and Plastic Resins - explored alternatives we've tried. Our state-of-the-art is woven acrylic fabric (sometimes sold as 'Dynel') providing a matrix for TiteBond III water-based (but 'proof') glue.

Problem is, formerly cheap acrylic went from about $5 to $25 per yard (yikes!) over the last ten years.

So we hunted around. Synthetic fabrics of every stripe were durn expensive, and we were reduced to collecting second-hand sheets (not a bad option, but take a lot of piecework).

And there was Tulle (bridal veil material)! We found some made of polyester that covered the horizontal decks of our new boat with plenty to double it on high-wear areas. All for about $1 per yard (less in quantity) through Amazon. TiteBond III is still cheap as paint.

Tulle wets down well, and the drying TBIII first layer has little problem pulling it flat (but help it along creases by spreading flat). It conforms well to tight-radius exterior and interior edges. With two coats of TBIII and topcoat of paint, the result is a moderately textured surface over a thick, reinforced film of hard-set glue protected from UV by paint.

So Tulle looks good as an inexpensive alternative to other synthetic fabrics. Time will tell... the gold standard is about 15 years.

Watch this space!


Our Application Procedure:

  1. Prep surface (smooth and tack-free)
  2. Pre-cut Tulle to fit
  3. Wet down Tulle with water (soaks the wood under)
  4. Immediately brush TiteBond III (ample, but don't sweat it)
  5. Let dry (will draw down Tulle for initial bond)
  6. Lightly sand sharp points, edges or ridges, if any and tack
  7. Apply second coat of TBIII (ample, but brush out to preserve weave)
  8. Let dry
  9. Prime while still 'green' (within 24hrs)
  10. Topcoat


One cool aspect is that, with judicious selection of products and a warm, breezy day, starting with a prepared deck we can (theoretically) manage five coats (2xTB, 1x primer, and 2x topcoat) in one long summer day. And much of that is kicking back and watching it dry.

Cheap AND efficient!

Wednesday, January 1, 2025

Plywood Construction for Less


Popeye Character by E.C. Segar

A vessel should be built as cheaply as possible. 
But no cheaper.

-- Adapted from Albert Einstein


Plywood Construction for Less

If we choose to build in plywood, before long you'll hear the statement: You'll be building with marine plywood and epoxy, of course. Both are fine materials and considered to be state-of-the-art.

But... here's where I find myself after three decades of boatbuilding for full-tie living aboard / cruising in the Pacific NorthWest (rainforest).


Marine Ply vs ACX

Marine plywood (MP) is AA (meaning both sides are nearly flawless), should be free of voids, have plies of equal thickness and relative more plies for any given thickness. It's a available in a number of species, each of which have a suite of virtues. The result is a stronger panel for its thickness when compared to plywoods of lower standard along any of these vectors.

The curious thing is that MP has mostly enabled boats to be built which are adequately strong, but lighter - using thinner marine plywood than if using lesser plywoods. Lighter means easier to drive toward a vessel's hull speed for a 'faster' boat. Except when using extreme methods the weight savings are slight for most cruisers.

In other words, the high price tag for marine ply buys 'speed' within a very narrow range (let's say from 0 to 4 - 8 knots). This is important for racers, but not nearly as much for the rest of us. 

ACX (one near flawless side, one OK side and eXterior glues) of decent species (fir, various pines, spruce and cedars) should last about as well as all but the most specialized MPs).

From ACX, we can build a strong, potentially long-lived vessel for far less cash outlay.

If we can personally pick through piles of ACX and have located a vendor with generally decent stacks, we can:

  • Check for voids. Use a wire to assess edge gap depths... shallow knots are easy to fill, deep voids may be injected with glue.

  • Check for an odd number of plies. Even numbers double interior veneers... in case of outer veneer failure, these are transverse and weak. Most 1/2in house sheathing plywood is 4 ply.

  • Check for even ply thickness. Reject outer veneers which have been over-sanded.

  • Check for general damage and irregularities. Reject as needed. If you know how much of a sheet you'll be using, damage can be allowed in offcut areas.
|
NOTE: When going through stacks, consider being scrupulous about re-stacking. You'll not only be welcome back, but you'll get a lot more help from appreciative, unpissed-off staff.


Epoxy vs PolyUrethane

Epoxy Resin is amazing stuff. Water-proof and solvent resistant once cured. Small molecules penetrate well and make the most of micro-surface areas. Various additives alter its properties for a wide range of uses. Its application is well understood and documented... although winging it is not recommended, with a little research and discipline, even beginners can get good results.

But it's expensive, toxic (mainly skin contact while wet), generates a small mountain of waste, requires special, hazmat disposal. 

While plastic (bendy), epoxy is not elastomeric (stretchy). 

Here's the rub: while most modern construction adhesives exceed wood fiber strength by a large margin, that wood fiber strength is the limiting factor. Merely plastic adhesives can point- and edge-load wood fiber until it gives, loading the next fiber in line. Elastomeric adhesives spread the load over a (small) region, allowing wood fibers to act together for much elevated failure thresholds.

We do continue to use epoxy in small amounts, mostly for minor repair. But it's down to a trickle.

PolyUrethane (PU) and Liquid PolyUrethane (LPU) are moisture activated, waterproof and solvent resistant when cured. 

LPU expands as foam to fill gaps. This is handy so long as we recall that expanded foam is considerably weaker than the unexpanded, non-elastomeric glue film. LPUs have a quick turn-over time that can be freaky, but helps move the project along.

PU is gap filling but does not expand but is highly elastomeric. Not all are created equal, however, so check the specifications of your candidates! Before cure, it can be thinned with mineral spirits, turpentine and various oils. This makes it more compatible than epoxy with oil / pine tar finishes (we've found that it has considerable adhesion over oiled wood, especially when thinned a bit... fasteners are primary in these cases, however, on a schedule to take the full, expected load). PUs tend to have long working times (varies with brand, temperature and humidity)... this is a mixed blessing, depending on the task.

Encapsulation vs Breathable

Encapsulation means sealing the hull completely with a waterproof, usually composite barrier (fabric, resin, primer, paint). Great system. But waterproof isn't proof against hard knocks. Dings let water in, and it can't easily get out. A season of haul-out for thorough drying is advised, with solid springtime maintenance on its heels. For full-time liveaboards in a wet environment, it's a long-shot.

The old, reliable method is oil and pine tar. It wipes on in the minutes of dry between days of rain and can be done piecemeal. It's water resistant from the moment of application. It breathes and moves with the wood.

It's not only cheap, but can be made DIY.


Conclusions

Here's our current thinking for less expensive construction. We've tried most of this on one scale or another, and find ourselves returning and doubling down.

  • Select ACX plywood - Fir if available. If laminating, A sides out.

  • LPU Glue for lamination - LPU has good adhesion in close contact and foams up with less of adhesion to fill voids, but even this lesser bond is considerable. We don't use LPU for small area jobs, however, as it has frequently failed in these cases (non-elastomeric). Consider its use for some bulkhead framing (which can be wider area), backed up by fasteners.

    Brands include Gorilla Glue and less expensive AkFix.

  • PU Glue for high-stress bonds - Chines, bulkhead / transom edges, deck-hull-joins can be made with chine-log construction and/or tape-and-glue methods (similar to epoxy, with PU thinned for tape saturation).

    Brands include 3M5200 (the gold standard, but expensive) and DAP PU Construction Adhesive (much cheaper and seems indistinguishable in practical performance on wood).

    NOTE: One advantage of PU is that it acts as a gasket, even with near-zero adhesion (contact using fasteners, say). Being elastomeric, it is compressible to create a water barrier. In these cases, any adhesion is gravy.

    NOTE: We haven't tried it, but think that PU in tape-and-glue should be a good match for copper bottoms with mechanical fasteners. Epoxy and tape doesn't seem like it would be as resistant to water penetration as it wouldn't likely form a happy gasket around fastenings for copper. Could be wrong on this, but it's an expensive experiment.

  • TiteBond III for sheathing - Especially with a fabric matrix, this is relatively inexpensive and easy to apply while producing a durable, waterproof barrier that is easy to maintain and repair. Topcoat with primer and paint.

    NOTE: We're about to try concrete slurry with a fabric matrix for deck sheathing. Hoping for low cost, longevity and good footing while avoiding paint topcoat. Will keep you posted with results! Might even work for the hull above and below the waterline (though we won't be trying that).

  • Oil / Pine Tar for sealing - Without a fabric matrix, these (in various Boat Soup proportions and recipes) are inexpensive, can be applied in a wide range of conditions and results in a breathable finish (moisture can come and, importantly, go!).

    We're trying a primer coat of tung oil (we've read that it's more resistant to mildew than linseed oil... so far so good) with  10-20% pine tar (can be purchase inexpensively at agricultural supply stores as treatment for animal wounds) and thinned by turpentine as conditions require (We're building in winter. Again.).

    The top coat can range from 50-100% pine tar. In the interior, we'll try furniture wax over the primer coat for the interior for a wipe-down finish.

Last Thoughts

One conjecture from George Beuhler that rolls around my head is the use of asphalt roofing tar for lamination. He noted that it's very adhesive once set (most volatiles evaporated). It would be far less messy between sheets of ply!

We've used it with success for various small jobs around the boat. Once set, it can be painted with latex paint without bleeding. White paint helps keep it cool and solid in (at least our PNW) sunny weather. On decks it can be topcoated with aluminamized trailer paint with a slight stipple for good footing.

A last possibility we toy with is using trunnels (wood 'nails') rather than metal. They're time / labor intensive, but superior in almost every other respect. Maybe in our next youth.

Lots of savings possible if building out-of-the-box!

Friday, November 25, 2022

Foraging Ahead: Independence Along the Way

Our Go-to Guide

Good info; great pictures
We also use it to organize notes from other sources


Hunter-gathers by nature
Store information for use,
Understanding that there may be a time
When information is scarce.

― Brian C. O'Connor, Jud H. Copeland, Jodi L. Kearns


This sudden sweet loot appearing...

― Aspen Matis


Foraging Ahead: Independence Along the Way

Anke and I have been pursuing the know-how and means to stay out and away for longer and longer periods. At least to have the option. We've come a long way; still have a long way to go.

We recently spent half of a four month rowing / sailing trip experimenting with near hand-to-mouth forage. During this time we lived mostly from fish and wild plants. We took along our complementary rice / lentil mix (2:1 for complete protein), dried fruit and olive oil, using each very sparingly.

Result? We lost weight and felt great! 

We were hungry more often than we normally tolerate, but not to the point of discomfort, and were eating amply at mealtimes. We quickly learned to make up a 'salad' for the day (fish and berries mixed in)... this allowed us to snack as needed between two cooked meals a day. 

Of note, the 'super-carb' diet of vegetables, fish meat and oils, and fresh berries - the bulk of what we were eating - supported the heavy exertion of rowing up to 12 hours a day (well... mostly more like 6 to 8).

Meanwhile, we were cooking and heating with a rocket stove modified for indoor use. This let us gather wood every few days with ratcheting anvil loppers (quicker and easier than sawing), while drying it onboard as needed.

So we're pleased to find that our sloppy assemblage of skills has brought us near to the point that we could subsist indefinitely, if need be. 

*****

If we wish to venture away for any extended stretch of time - let's say months to years - from towns / resupply it helps to find werewithal along the way... shelter, water, food, fuel and materials.

Shelter is pretty easy, assuming we're sailors aboard our live-aboard vessels... they come with us as a matter of course. When necessary, shelter may be improvised from foraged materials (a big subject... maybe later?).

Water is nowadays only a little tougher. Offshore seawater desalinators are available in manual models and can be DIYed

'Longshore, especially in our rainforest, spring and groundwater flows provide plenty of fresh water, which can be easily filtered by compact, cheap and durable systems. These too can be DIYed with simple filtration systems, using home-made charcoal as the active principle. 

A plastic bottle filled with water and left in bright sun for a sufficient time will UV-sterilize its contents (SODIS: SOlar water DIStillation). Sadly, plastic bottles may be foraged along all the coasts of the world.

Food is foragable in hunter (fish, game, fowl) / gatherer mode. 

For sailors, fishing is the easiest, especially if you are willing to eat cod and other 'scrap' fish. I'll include other seafoods in this category, despite not being fish per se... crustaceans and molluscs  (grazing, single shell types are less prone to PSP (Paralytic Shellfish Poisoning) than bivalves).

Hunting and fowling are another deep subject I'll leave for another time. Consider salting, smoking, jerking and canning as longer term options for preservation without a freezer.

Most environments that are even marginally intact support a wealth of edible plants, and guides are generally available featuring local edibles and those to avoid.

Guerrilla gardens can help concentrate and enhance native plants, and add select, supplemental varieties. In our region, for instance, high-carb plants are few and far between... guerrilla potato patches are one way to add them. Alternatively, consider adopting a paleo-, neo-paleo- or neo-lithic diet... all three come much easier once you're out there.

NOTE: These diets are a little fuzzy. Generally speaking, paleo diet allows only wild grains (if at all), neopaleo diet adds early, cultivated grains, while neolithic adds 'modern' whole grains.

Plants can be dried (big weight and volume savings... just add water!), canned and fermented to preserve.

Fuel is used for heating, cooking and power (electrical and possibly propulsion).

Wood and other bio-fuels can be collected from land and shorelines along the way. 

We've had the most experience with wood, and supporting technologies are highly developed. A mild-steel stove or range, for instance, will work with driftwood, where cast iron will degrade. Rocket, gassifying and forced draft stoves are widely available, DIYable, and have the advantage of burning more efficiently and with less smoke. Less wood is necessary, and smaller pieces work well meaning reduced impact ashore, footprint aboard and gathering effort.

Materials are mostly wood in some form, and, nowadays, beach-combed trash. These can be used for repair, replacement and fabrication of new features.

Wood grows on trees, and spars of all sorts - masts, booms, battens, sprits - can be constructed with minimal shaping (especially when your vessel has been designed for tree shapes). Planks, knees and half-rounds (rails) take more effort, but can cover most any ship-board need. Wooden vessels take these materials in stride; resin based and composite vessels can be patched with them but may require further work once back in 'town'.

Beach combed garbage can often be repurposed to fill all sorts of needs. We're living in the neo-plasticene, after all. Planks, fasteners, containers, hoops, chafe gear, (PVC) springs, hose, valves, and so on can all be improvised from plastic garbage. There's an amazing assortment of metal this and that floating about, too, attached to wood or half sunk in sand. Repurposing rulz!

*****


Two additional aspects are key to all this; skills and tools.

Skills include the ability to identify, hunt / gather / process / preserve wild foods, tool use and maintenance. Is ingenuity a skill? Certainly of help! Ditto a sense of humor.

Tools run the gamut and are suited to your approach. Tools for mechanical, wood-working, wood-gathering and transport, fishing rods and reels, firearms, canning, drying, cooking and processing and maintenance are all possibilities to be tailored to your particular approach.

I lump into this category fasteners, wire, zip-ties and the what-have-you that lets you keep stuff from moving. Lubes to keep stuff moving. Consider generalist items that can be used flexibly in unexpected situations.

*****


The learning curves involved vary from low pitch to steep, and all are more or less life-long pursuits. That being said, the journey has rewards from the very first step, and the entire path is rich in satisfactions.

Foraged necessaries extend our time at large on the water, freed from return to the world of shopping and the cash economy with all its demands.

The reward is freedom!


PS. On our return, our first serious guerilla garden plot of potatoes had done well despite record heat early on, followed by exceptional wet! WooHOO!!

Sailing quietly, doing nothing, potatoes grow by themselves!


Spuds in Space!
Well... it's a Rocket Stove.


Monday, April 25, 2022

S/V SCAVENGER


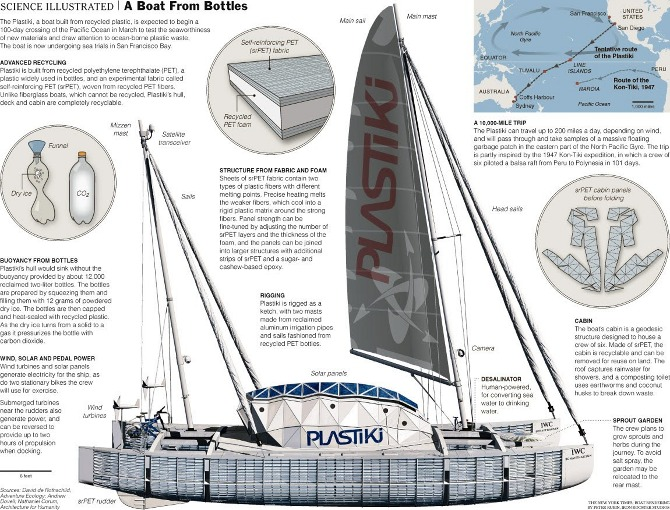
PLASTIKI

– A particularly ambitious vessel from found materials

From theplastiki.com


For a scavenger, patience is the key to the pantry.

– Delia Owens


S/V SCAVENGER


Trouble can come upon whole peoples, catching everyone by surprise. It happens. It’s happening now around the world. It can happen here.


Let’s try a little thought experiment…


Say that things have fallen apart, a little or a lot. Either the local, regional or global center did not hold and things got chaotic. Looters came and went, along with most residents. 


Say we want or need to build a sailing vessel from scratch with materials at hand in a depleted sub-urban area. Let’s say things have been permanently abandoned, and the moral coast is clear. Let’s further stipulate that all stores have been emptied.


What do we need? What of that is at hand??


Triloboats are designed to comprise a workable minimum. Simple box barge / scows, they are relatively quickly and easily built from rectangular materials (sheets and planks). They’re largely ‘form stable’, requiring little or no ballast. 


But there are plenty of other contenders!


Free-standing rigs simplify construction immensely. They are set on what are essentially flagpole principles: get a solid grip at the bottom and let the rest fend for itself.


A whole range of waterproofing puckies can be magicked up from combinations of asphalt, oils, waxes, gas/diesel/mineral spirits/turpentines, cement (lime) and toxins (antifouling).


So let’s look around for what’s at hand…


  • Residential – Fasteners galore, plywood (sheathing and sub-floor, mostly), 2x framing, beams (solid and composite), hardwoods(?), insulation (foam and fiber), windows, roofing (asphalt, sheet metals and flashing), plumbing, electrical, hinges, carpets, fabrics, housewares, soaps and bleaches. Jonni Rings™ (micro-crystaline wax rings sealing toilets)!!! Electronic and electrical.

  • Commercial buildings and schools – Bolts, hardware, hardwoods (bars and VIP enclaves), plumbing/piping, stainless sheets and furnishings (from kitchens), propane hardware (can be used with home brew methane), industrial cleaning agents, big glass, plexiglass, electrical, asphalt (flat roofs). Awnings?

  • Cars, RVs and trucks – Oils, 12VDC electrical and batteries (keep an eye out for lithium based batteries or better!), alternators + regulators, inverters, engines (can run on wood -smoke or -gas), pumps, hose, radiators (vehicular air conditioning radiators use lead-free solder), bolts, tires, tarps?, jacks, tools and tire irons, maps.

  • Roads – asphalt, bolts (guardrails), sheet metal (signs), manhole covers (ballast), culverts. Bus-stops (plexiglass).

  • Power Lines and sub-stations – Poles, guys anchors, bolts and Ubolts, turnbuckles, wire (electrical and supporting cable). Copper for melting and plate production.


Appliances and accessories yield small AC and DC motors (windshield wipers, vacuum cleaners, hairdryers, washers and dryers, etc), alternators and vacuum pumps (refrigerator/freezers). 


Line can be found in various ropings, scaffolding and window-washing set-ups, on flag poles. Keep an eye out for line in the back of trucks.


Look around for tools. Saw blades and files are some of the harder things to improvise, so keep an eye out. The business end of power tools can be given handles and used manually. Home garages, garden sheds and firehalls may have been overlooked. 


If you’re in a higher-brow kind of area, look for copper furnishings, roofing, gutters and flashing for anti-fouling.


Marinas and boatyards could be full of goodies, up to and including vessels that weren’t cherry-picked and need some work, much of it left behind in the rush to turn-key

 (see Bob Wise’s Volkscruiser Blog). 


Junk yards, of course. And landfills.


I’ll bet libraries - full of analog know-how - will largely be unlooted. Meantime, any skills acquired in advance of trouble are a plus.


And I didn’t even mention dumpsters!


Point is, we’re awash in material abundance which our ancestors would have coveted, and immediately pressed into service. No matter which way we turn, the merest garbage of our age is the stuff of early sci-fi dreams.


Consider looking around for vessel ideas that might work well with found materials. Let’s use our imaginations! Think out-of-the-box!!


The scenario of our thought experiment is extreme-ish. But no need to await some fallen sky… much of all this is available now for nearly free. Permissions to mine liabilities (condemned or obsolete installations) are easy to come by.


Look around!


Related Posts:


A Rogue’s Gallery of Boat Recipes

Musings on the Economics of DIY

Simply Does It


Tuesday, March 8, 2022

A Rogues' Galley of Boat Recipes

Boat Soup


Boil, boil, toil and trouble,

Fire burn and cauldron bubble!

– From Shakespeare’s MacBeth


A Rogues' Galley of Boat Recipes


Once upon a time, we mixed our own. We mixed our puckies to fit the need at hand. It's a very personal process... secret recipies, undisclosed additives and esoteric procedures. Sound crazy? It was, and - be warned - some of the ingredients carelessly handled made more than a few adepts more than a little crazy-for-real.


Better-living-through-chemistry stuff was still in development and, if available, cost an arm and a leg. Slowly, the industrial materials got better and cheaper. Now, when I ask around, I find that it’s only a few old-timers and Luddites that still mix our own.


Not to disparage the new goods… quite the contrary. Adhesives can’t be matched by home-brew. Modern resins are ultra-versatile; a one-size-fits-most solution. Paints are hard to beat.


But where goes wood, there lies a spectrum of needs. Wood works and swells and shrinks and cracks and closes up again, as one expects of a once living material. To meet the needs of wood, a just-so solution is often the best fit, filling in the wishlist between the broad strokes of modern, industrial magic.


Using them sets you down a road less traveled. Insofar as they replace plastics, they might be considered ‘greener’ on the whole. Their half-life is certainly shorter. For ‘natural’ wooden boats to be maintained in the field, this approach has a lot going for it... while they must be renewed more often, thy can be applied piecemeal in very short weather windows.


All in all, I can’t generally recommend going back to them while modern methods are available, but they can be a good fit for many situations. They DO represent a set of alternatives, and set one to thinking along pathways now mostly overgrown.


The following amounts to a menu ingredients with various consistencies and properties. Being mostly oil-based, they can’t easily be painted over or adhered to, neither in the short nor long term. Their economy is outstanding.


Here’s what I’ve stumbled across from boatwrights and fishermen and women…


INGREDIENTS


The following include materials I’ve heard of as having been used. New stuff shows up all the time (can you say Buckyballs?). Mix, match, improvise and adapt!


Thick Stuff


  • Bees'- and Microcrystaline Wax - Great bases for filling cracks or waterproofing. Microcrystalline wax is superior… most toilet rings are high in it and cheap, or it can be purchased pure.

  • Asphalt - Fibered or not, is used for roofing. Messy but cheap and versatile.

  • Tar (aka Pitch) - This used to be common around boatyards. Have to heat it to melt.

  • Furniture/Car Wax -- This stuff is easy on and can be combined. Buff to a beautiful finish. Check for exterior rating if exposed to UV.


Oils


  • Pine Tar - A fave of mine. Anti-fungal. On the thick side.

  • Tung Oil - Reputed not to mold or mildew. Turns laquery black after long sun exposure.

  • (Boiled) Linseed Oil - Pleasant oil… ‘boiled’ has drying chemicals added.

  • Oil Sludges - Generally used crank-case oils.

  • Corn Oil - New to me via a young old-timer. Inexpensive base. Outdoor apps look great, several years down the road.


NOTE: All of these are prone to spontaneous combustion. Rags and brushes should be immediately burned after use or immersed in water in a closed, metal container. Do NOT leave rags in direct sunlight for even a minute! (Experience talkin’, here).


Solvents


  • Turpentine - Distillate of wood. I trust this one irrationally.

  • Mineral Spirits and Paint Thinners - Cheap and work.

  • Diesel - Ditto, but smells like you’d expect, and never quite goes away.

  • Gasoline - Careful with this one. Deep penetration, then evaporates.

  • Acetone - Ditto.


NOTE: All of these are rich in VOCs (don’t breathe them) and highly flammable to the point of explosive (no sparks or flame). Note and employ all pertinent safety precautions!


Thickeners (Thixotropics)


  • Wood Flours - Cedars are fungus resistant, as are select exotics.

  • Talc - Thickens without setting firm (sometimes used above the waterline).

  • Chalk - Thickens without setting firm.

  • Cement - Thickens, but also sets firmer (sometimes used below the waterline). Highly alkiline, it protects wood to some extent. Consider latex additives, fabric matrix and/or chopped fibers if using alone.

  • Plaster of Paris - Ditto.

  • Brown Paper Fiber - Special case additive to tar ‘ties the room together’.

  • Various Chopped Fibers - Glass, poly, dryer lint, hemp, oakum, etc..


Additives


  • Bottom Paint - Cheap copper bottom paint is antifouling for below waterline.

  • Cuprous Solutions - Used for toxifying wood in contact with ground (e.g., Naphtha and Cuprinol).

  • Cayenne and Paprika Powder - High BTU capsicum is anti-fouling. Added to exterior below the waterline. Might work in the interior, and seem to be much less dangerous overall than leads?

  • Varnish - This is a generic term… lots of proprietary varnishes with various properties.

  • Powdered Mica or other UV inhibitors - These help slow deterioration and oxidization.


  • Red and White Lead Powder - Formerly used in beddings and exterior primer coats. Work great, but are highly toxic, especially when in powder form (both applying and repairing/renewing). Available as pottery glaze. Many consider these off-limits… we prefer Pine Tar as our go-to anti-biotic, with copper or capsicum thrown in as needed.


Commercial Additives

These are a few commercial items that many have included in their brew:

  • Penetrol and Thompson's Water Seal -- Two particular commercial brands that can be useful in the mix for exterior uses. Both are thin liquids.

  • Naptha (Copper Napthanate) -- Very toxic liquid, now banned. For careful, external use only.

  • Creosote - Very toxic biocidal, tarry substance. Can be DIY. It was sometimes used under a copper bottom paint to double protection.

  • Polyethelene Glycol (Anti-freeze) -- The green, poisonous stuff (vs pink, safer polypropylene glycol) is highly anti-fungal. Hydrophilic (loves water), it can penetrate wet woods, but also washes out over time. Rumor has it, it penetrates paint without staining for easy application.

  • Borax -- Powder additive with antifungal properties. Water soluble, however, so needs renewal.


NOTE: Again, many powders and solutions are NOT to be touched, much less breathed in. Consider carving conspicuous warnings to boatwrights down the road who may wade in unawares.


RECIPES


Rogues’ recipes are fuzzy things, and tend to vary wildly from person to person. These proportions will vary in the real world, according to your choices and by ingredients’ specific manufacture. Consider the proportions given a rough starting point.


Get to know the materials and how they react in your environment. Consider your purpose, and select for the properties you desire (flexibility, reset in warm conditions, penetration, hardness, antifouling, etc.). Nuance one way and the other as you deem fit, adjusting for the properties of each ingredient.


Small batches and test samples are strongly advised until you get a feel for it. A graduated Liter makes for easy, proportional math. All recipe parts given by volume. While all can be combined at ambient temperature, most mix better when heated in a double boiler, then allowed to cool.


Feel free - very free - to  experiment, innovate and otherwise roll-yer-own. It’s kind of addictive, really!


Here are a small sample I’ve encountered… adjust, extend or modify as desired:


Bedding Compound -


  6 parts Thickener : 1 part Oil : Dash of Additive (anti-biotic)


  Talc is a common choice for Thickener, while Pine Tar is antibiotic. Adjust mix for consistency.


Radial Crack Filler


 1 part Pine Tar : 1 part Wax


 Thicken with more wax, thin sparingly with turpentine.


Seam Compound (below WL) - 


  2 parts Fibered Asphalt : 1 part Portland Cement : 1 part Cuprous Bottom Paint


  Stiffen with more Asphalt, harden with more cement, thin with more paint.


Canvas Waterproofing -


  1 part Wax : 1 part Oil : 1 part Solvent


  Consider reducing Solvent to effective minimum.

  Saturate warm cloth and roll to penetrate fibers. Maybe check YouTube for a range of ideas.


Wood Slurry (Sealer for horizontal exterior surfaces) -


  1 part Wax : 2 parts Oil (Corn Oil was suggested to me for this application)


  Apply on cooling wood. Scrape lightly smooth once cooled.


Wood Slurry (Sealer for vertical, exterior surfaces) -


1 part Pine Tar : 1 part Oil (:1 part Solvent)


Consider adding Solvent for the first coat and a little Wax for subsequent coats.


Wood Exterior Water-Resistant ‘Stain’ -


10 parts Heavy Solvent: 1 part Oil : 1 part Non-Fibered Asphalt Tar


More Tar darkens; less is lighter. Consider an inexpensive solvent (such as Diesel) that will evaporate.


NOTE: For exterior coatings aka ‘Log Oil’s, I remember seeing a US Forest Service recipe that added powdered Mica to reflect and protect against UV rays. Powdered Mica is widely available, but I’m not sure about effective proportions. One full recipe is cited in the Using Paint, Stain and Oil section, from Dovetails and Broadaxes: Hands-on Log Cabin Preservation by USFS, which I am unfortunately able to access presently.