Please visit our home site at www.TRILOBOATS.com.

Anke and I live aboard WAYWARD, and wrote about it's design and construction at ABargeInTheMaking.blogspot.com.

Access to the net comes and goes, so I'll be writing in fits and spurts.Please feel free to browse the archives, leave comments where you will and write... I'll respond as I can.

Fair winds!

Dave and Anke
triloboats swirly gmail daughter com

Showing posts with label DIY. Show all posts

Thursday, July 30, 2026

Glide Rig: A Hybrid Rig for Rowing Sailboats


MUSTELID gliding along
Full Foresail - Roll Reefed Main - Driver


All I wanted was a tall ship
And a star to sail her by
  Through the night.
  Through the night!

-- Motherlode?


Glide Rig: A Hybrid Rig for Row/Sailboats

Why name a rig? Any technical description is a mouthful, and few people appreciate mansplaining. A good name is evocative, calling to mind traditional associations. Or suggestive, offering a clear clue to the nature of its subject.

Gaff Rig, for example, suggests the spar itself and the sail's quadrilateral shape follows. It evokes robust working sail standing against the gale. The more initiated might recall its ability to scandalize—dumping half its area in a sudden gust. They might recall peak and main halyards, running backstays, and the tack-to-peak creases that indicate a correct set.

So, here is a rig in search of a name...

But first, the mandatory get-in-the-door question from The Commitments: “'Oo are your influences??”

Phil Bolger (of course) observed that most of us aren't out to win a race or even do much sailing to windward if we have any choice in the matter. Outboards and engines mostly handle the windward hemi-circle, so why expend design effort, gear and $$$ on maximal windward ability? He accordingly started to offer simpler, cheaper rigs.

That got us thinking. For a rowing, mostly downwind sailboat, we want a long, slim hull. These  are easily driven but offer relatively low form stability. Ultra-shoal draft limits ballast stability. A snug, low-center-of-effort sail plan that is easily handled and reefed pairs perfectly.

On a row/sail craft, we primarily want the sailing rig to pull us down- or across the wind. Positioned well forward as a foresail—clear of a forward rowing cockpit—it should provide powerful lee helm and steady, balanced traction. For sailing upwind, however, the balance picture changes. We want the total CE moved aft to for weather-helm and good tacking.

Quadrilateral and spinnaker-like sails work, but don't transition easily between the two modes.

Enter Frederick Ljungström, inventor of Ljungström Rig a boomless, double Leg o' Mutton (LOM) triangular sail attached along a shared luff to a  rotating mast. Off-wind, it sets and handles much like roller-furling twin staysails, and like them, provides considerable upward lift.

Sailing into the wind, the sails are doubled, overlapping on the lee side and sheeted as one. This constitutes a half-reef, and a large aftward jump of its CE.

To reef, the mast rotates (we prefer righty-tighty, lefty-loosey), furling the sail snugly around the standing spar. No halyards, tack or clew downhauls, bunts, or nettles. Just roll it up and carry on! As a bonus, simple flat-cut LOMs furl tightly with minimal windage, forming conic sections similar to a Crab-Claw rig.

Since a slim hull cannot spread wide sheeting angles, we re-introduced booms along a loose foot. The result is a doubled variation of the Holopuni Quick-Rig (a great name!) which is similar to a setup offered on the SeaPearl 21.

Finally, three-masted junk schooners (e.g., CHINA CLOUD) inspired us with their fine control of their relatively low total CE, bow and stern maneuvers, and reduced area on each mast. Even on a smaller vessel (within reason), the advantages of multiple masts are striking.

Why Balance Matters When Rowing: Multiple sails give fine control over the balance of the helm. Especially when "motorsailing" (row AND sail), good balance leaves our hands free for the oars and reduces steering by stroke with ensuing fatigue. Even over a short haul, that makes a big difference! A driver - often set while rowing when the others are stowed - helps hold the bow up toward the wind. Where the bow want's to 'blow off' this is an asset.

A Problem on the Side—and a Solution

There is a catch with standard booms. They are fixed at the mast and sheeted toward their outboard end. As the sail is reefed, the clew moves inboard of the sheets, pulling laterally on the mid-boom, bending it toward the CE. Heavy spars and compromise arrangements are the usual fix.

Our solution? The Gliding Grommet.

We use a rope grommet that glides along a lightweight boom, with both the clew and sheets attached directly to it. A light clew/sheet outhaul is led through a turning block at boom's end, spreading the sail as desired.

When reefing, ease the outhaul, roller furl the sail as needed and make the outhaul fast. The grommet, clew and sheets are move inboard along the spar. The active, loaded portion of the boom automatically shortens, increasing relative strength. It absorbs the load purely in compression, avoiding mid-span bending stress. Cheap, DIY, and it works like a charm.

Glide Rig Specification

Mulling all this together, pulling out the main points and generalizing, we arrive at...

The "glide" emphasis is on downwind sailing and a strong balance shift for upwind sailing, supported by the working rig (I.e., without sail changes):

  • Foresail in 'cat' position (well forward) and,
    • Sets large area for off-wind sailing
    • Reduces area and moves CE aft for upwind sailing

  • Main near amidships and/or,
    • Backs up the foresail for downwind sailing
    • Becomes the driving upwind sail

  • Driver well aft
    • A smaller sail for balance and riding

"Glide" can be used adjectivally in the usual manner... where we would say "That's a junk schooner, ketch or yawl", we can say "That's a glide schooner, ketch or yawl" or combine them, "That's a glide junk schooner, ketch or yawl." 

Generally speaking, we wouldn't apply the glide adjective to schooners, ketches and yawls that don't pass drive from the foresail to main when switching from down to upwind sailing, and vice versa. Ditto cutters, sloops and catboats.

But any schooner, ketch or yawl is arguably a glide rig. It's a threshold, as is often the case. Boundaries are fuzzy and often the subject of over-heated tavern debate. Personally, I find it a simple matter of personal perspective... we each get one and to each their own.

With this in mind:

  • Two- or three-masted schooner, ketch, and yawl variants may qualify.

  • Main and driver with other planforms and rigging may qualify.

  • Rig particulars—such as specific sail planforms, unstayed masts, roller furling, the Gliding Grommet solution, and such—are handy but optional.


NOTE: We call the stern sail a driver... it seemed the better option among mizzen (confusing), jigger (???), dandy (too high-brow?) and spanker (let's not go there).

MUSTELID's Glide Rig

I would now call MUSTELID's a three-masted glide LOM ketch rig. Fore and main sails are of equal height. LUTRA's main will be slightly taller (also quadrilateral with a sprit in the mix), so I'd call her a three masted glide hybrid schooner rig.

We tested Glide Rig extensively in MUSTELID over a wide range of conditions, as documented in the video series, MUSTELID Venture.

MUSTELID's foresail is a Ljungström sail (double LOM) rigged and positioned as described above.

Her midships main is a single LOM boomed as described and set aft of the forward cockpit. In this position, it becomes the heart of any windward sailing we might do, with the foresail reefed (moving the combined CE aft) and doubled over to sheet as an LOM. We offset this one to clear the BIRDWATCHER cabin's mid-line companionway.

We set a small LOM driver dead aft for offwind sailing, to 'crank in' weather helm, hold the bow up when drifting and serve as a riding sail. It is a big help when rowing in headwinds, especially when we must row at an angle to the wind. This sail was offset opposite the Main to clear the rudder and tiller. In this position, it can be squared across the transom for a mid-line, downwind push.

It is sprit-boomed in pretty much the standard manner. The boom is longer than usual, extending forward of the mast. A U-sheet leading forward attaches one leg to the inboard end of the boom and one to the outboard. This gives us leverage to trim and make fast. The sail is fixed to the mast (no halyard)... to stow, we release the snotter and raise the outboard end of the boom alongside the mast. A light line fixed to the masthead is used to wrap and secure the boom and vertical, hand-rolled bunt of the sail.


Roll yer own and glide on, Friends!


Monday, July 20, 2026

LUTRA Launched!


Floating high!

LUTRA - Genus name of river and sea otters of the family Mustelidae.


LUTRA Launched!

You'd think it would be getting easier with experience. Not sure it's gotten any harder, but it takes longer than we think and leaves us elated, but whupped each time.

Building one's own vessel - DIY - is a mixed bag. 

On the one hand, it's a long sequence of tasks presenting varying degrees of challenge. Learning curves, supply chain foibles and material quirks, domestic and social duties and distractions... even - or especially - weather all conspire to prolong the ordeal.

On the other, we get exactly what we've dreamed and crafted into being, with a tailored fit no production vessel can match, and the care and attention no professional can afford.

A dream, a plan, a few tools, a pile of materials, skills acquired along the way, and stubborn persistence are all that are required.

And time. LUTRA has about 4 months of work in her for the two of us amateurs. Extend to about 6 1/2 months accounting for the copper plate - including stripping it off WAYWARD and some wasted time learning to translate 2D angle to 3D. Extend to 21 months accounting for all those detours I mentioned on the one hand.

We took a bit longer than necessary to launch her. Each boat is different, and when possible, we like to launch her by ourselves using tools we carry and materials that can be found anywhere in our cruising grounds. This time, we were mostly successful on both counts, but kind friends had to be dissuaded from lending their time and heavy machinery. We look kinda Luddite to most, but we have to be able to handle a potential move out there, and on our own. So we grunted and groaned our way to the water in only three days.

There's work left to go.

We'll spend the next month finishing out the interior, building a rocket stove and moving aboard. Then off to find spars a few miles from Tenakee. Then a few more miles to rig her. But it's now on our own time, and afloat.

The archipelago awaits!


First kiss o' the Sea


Tender time
Photo by Beret Barnes


Towed by Friends
Photo by Darcie Ziel


Monday, April 13, 2026

Guest Post: MARY H by Chris George


MARY H
All photos supplied by Chris George


Lord, it was day and night and night an day work when in season!

- Some Old Salt


MARY H
  Guest Post by Chris George

In 2022 Massachusetts announced a small business grant for Green Innovation and Climate Resiliency in the commercial seafood sector. I won the grant and built a scow for my shellfish farm. Having read the Triloboat Blog for years, I had formed the idea that a sailing scow could be useful. The book Trade Winds by Christiaan de Beukelaer implanted the idea of using sail, and maybe electric, to power my work on the farm for climate reasons. The idea was born and I received $25,000 to build and work the boat. She is named the MARY H, after my wife, and her mission is to carry and deploy aquaculture gear and pick up oyster and quahog seed and drop off harvests to a hatchery facility about one mile away across part of Cape Cod Bay.

The design already existed in Howard I. Chapelle’s classic American Small Sailing Craft as the Cape Cod Bay Pound-Net Scow. In the old sailing days, these boats mainly fished herring - and fished the species out! They look like the TRILOBOAT StudyPLAN SANDBOX, but evolved slightly curved sheer lines helping with the “roll to the sea, as there often is on the Cape shore” and historically carried a pile driver. I sent to the office of ship plans at the Smithsonian and for $60 they sent me a tube full of diagrams of old scows -including Great Lakes types - along with Chapelle’s lines, taken off in Provincetown in the 1940s. To start I had Dave’s blog, Chapelle’s book and an awesome picture I found on the internet of a model built locally off the same plan, credit Rob Napier. 

The original boat in the plan is 36’ and I determined for the scope of the project, and town mooring regulations, to scale the build to 20’ - though I did wonder if proportions would get weird later on. So off this poster-sized plan I made a table in my notebook with an engineering ruler and scaled all the points of measurement for 20’. I also set about making an 8’ mock up with a couple scrap veneer plywood sheets and a cardboard model. Making the model was fun just tracing the plan onto cardboard and adding a chopstick mast and paper sails; at that size my old G.I. Joes look like a person of 5’4’’ height. 

To build the boat I had written some pay into the funding to hire skilled help. I hired a friend of mine, a retired roofer and now bricolage artist with whom I had already worked on a few building projects. The first thing we did was to locate a tree for the mast and let it cure for about a year. It’s a beautiful mast! We found a very straight white pine of about 24’ in the woods on a neighbor’s property. Stripped it with a machete (held like a spoke shave) and then coated it with wood preservative and hung it in my garage. 

Severely squeezed into my garage, the actual assembly and building went straight down the lines of “Instant Boats.” Dynamite Payson virtually dictated the techniques that I would modify. Cutting out the main pieces from plywood was most of the early work. I referred to the notebook table a lot and because the math was simpler to convert inches in decimal (remember the engineering ruler), I made sure to make an extra column for the conversion back to 1/16th inches for my measurements on plywood, transcribing the height of the sheer above bottom. The one caveat is that this measurement required another column in the table because the Pythagorean theorem had to be applied to account for the flare of the hull as the Chapelle plan just shows a profile view. No lofting though! A Kreg brand T-square was used constantly. I made a useful misstep while building the mockup that helped me realize to account for flare because I paid a printer to just proportionally enlarge the plan and I used it like a template. When assembling the mockup (which I may still employ as a standup paddleboard) using stitch and glue with zip ties, it felt scrunched down. This effect was not noticeable at the tiny size of the model. The actual cross section of MARY H is 5’ across the bottom with a 5’6’’ beam on deck. 


The winter months were spent in the garage with a space heater cutting and edge joining the plywood with epoxy and fiberglass. The gunwales were constructed in this way as well as five transverse bulkheads for holding the structure together like a ladder. Striking the fair curve of the bow and stern were the most ancient and nautical feeling part of the process. It was accomplished by laying the measurements on the plywood with nails and bending a piece of PVC edging around them. The curve was hand cut by eye with a buzz saw through the skill of my roofer friend. 


Building a boat was a lot to ask of my family, three children and one an infant. I did a lot of work after bedtime into the night and tried to involve the children as much as possible. One problem spot occurred while attaching the bottom to the sides for tape and glue. We decided to attach the bottom with the boat upright, bending the kerfed bow and stern up with shims and two-by-fours at both ends. The shape of the boat would be held in place for gluing with bar clamps and screws edgewise above the waterline. The deadflat was easy enough and all joints were bonded with epoxy fillets and fiberglass strips. But the ends had to be done in one fell swoop laboriously levering up the ends of the boat like flaps over the piles of shims while running around to make everything even as sealant set between the seams. We went way over time and things were starting to fail as my wife pulled in with all the kids. Seeing them all it was such a sacrifice not to be able to care for my baby at that time. But I left it in the care of my friend and somehow he finished the bottom single handedly. 

With the hull still upright I built the centerboard box up out of clear pine boards and more marine plywood, splurging on bronze screws. Now looking boatlike, I got a group of friends together to help flip the hull over onto its transoms for sheathing the bottom. All were promised fresh clams or oysters. I sheathed the entire hull on the outside only with one layer of thick fiberglass cloth bedded in epoxy. Once painted the same crew helped me flip the boat again onto a trailer which I picked up reasonably from the USACOE via the GSA, a good resource. The garage doors were popped off the hinges and the boat was carried out by hand. I had lined the trailer with an old foam mattress that I saved for this purpose so she would have a soft landing onto the rollers. 


Outside in the Spring I built deck stringers out of clear pine strapping and built the mast step of extra fir from the skeg. The boat was filled with 100 empty soda bottles for buoyancy with some sealed plastic water cooler carboys for good measure. The deck was cut from the same ½’’ marine plywood as the rest of the boat and laid as efficiently as I could manage. Between every seam I shot marine sealant or sometimes silicone caulk. A somewhat big mistake was not better sheathing the deck somehow because it leaks during rains. It has to be pumped out after rain and storms now while on the mooring. The hull is tight however so the water inside is “fresh.” One splurge was for EVA foam faux wood decking. Rolls of this stuff were moderately expensive but are a big facet of the historical look, and napably soft. Many people have stopped by the boat and remarked they thought these were actual planks. Rub rails are made of super cheap highly sacrificial lengths of furring strip.


Rigging is piecemeal. I got about 100’ each of tan synthetic rope for the halyards and great thick faux hemp nylon rope for the main sheet, also a historical touch. I made a forestay with hardware store steel wire and shackles. Chafing gear is cut garden hose. The sail was made at a sailmaker in Falmouth, Massachusetts. The proportions are kind of weird as the boom is a real deck sweeper. It will help to reef when I sail the boat more in earnest. At this point she sailed down wind, in the lightest winds three times in the Summer and Fall of 2025. Yet, when I put the sail up, down wind, in the lightest wind, it is still hard to deny we are under sail. And that feels great! I am looking at a potentially life long learning curve so there is plenty of time to perfect it. For electric propulsion she hangs two five horsepower German Torqeedo engines off the stern with some Chinese ePropulsion stick engines for backup.

MARY H now sits on the hard waiting for the 2026 season coming up at the end of March. All the people who helped were essential: a landowner letting us search for the mast, friends and relatives who flipped the boat or shot screws or gave friendly advice, authors - I owe them all a ride or at least some oysters. Spiritually, there have been few journeys as rewarding for me as building this boat. At the Christening, the bottle was smashed by the real Mary H.


Expenses

Dave, here. Chris provided his cost accounting under the grant in response to requests in the comment section. His itemized list can be read HERE. Please click on the spreadsheet image for a more legible pop-up.


Tuesday, November 18, 2025

Live Aboard MacroEconomics: A Case Study


WAYWARD earning her keep


As you live your life aboard a vessel, be aware of the sea of life on which it floats and on which it moves forward.

— Ian Gardner (as remembered)


Whatever floats your boat!

-- Sailorspeak


Live Aboard MacroEconomics: A Case Study

LUTRA, the boat we're currently building, offers an as-of-today set of numbers to puzzle over.

Numbers, of course, are slippery li'l devils. What counts in or out? Round up or down? Will the future hold the course? Nonetheless, it's worth a look! Here, I'll take a bird's eye look at up-front dollar costs of our live-aboard vessel relative to rent. 

So LUTRA. Our labor is 'free' (ha!). Time is probably about 6 months of steady, optimal workdays... spread across a year and a quarter in our actual context. Let's say 3000 person-hours (2 persons x 8 hours/day x 180 days, rounded up). The time investment itself hurts less than time lost cruising at large!

When all the dust settles, we arrive at two figures for her out-of-pocket cost. For building site, construction and materials of the hull and furnishings, around $5K is pretty close. Mind you, this is still semi-remote, so costs are high. That's the easy part.

Where it gets complicated is in evaluating outfit, gear and copper we're carrying forward from WAYWARD (and earlier boats!). 

WAYWARD's copper plate was originally a whopping $10K in 2014 dollars. We figure that it paid for itself in about 5 years, saving a rugged alternative finish (e.g., fiberglass/resin), anti-fouling paint, haul-outs and associated costs, repairs, on-board insurance, etc.. After 10 years aboard WW, we used half of it and her chine angles for LUTRA.  Each half is worth around $4K as #2 scrap in 2025 dollars defraying the original outlay.

Similar calculations go for anchors, chain and rode, a pile of fasteners, piano hinges, coms, nav lights and other gear.

So... um.... I'm going to say $1K for these components. Neither replacement value nor market value, but a nod toward what might have been an expensive heap if it hadn't already paid for itself. 

That brings LUTRA's up-front dollar cost to ~$6K.

We're building in our home port of Tenakee, Alaska. Currently, property is well out of our reach. Rents are running around $1K/month for a studio-ish space, utilities included. IF you can find one open. There are only a handful and chronically occupied.  In a larger town, such as Juneau or Sitka, low-end rents average $2K - $2.5K/month, utilities NOT generally included. Tight there, too, but there're generally more openings coming and going.

So let's start with our local $1K/month. That's $12K per year. LUTRA's build is paid off in 6 months at large, a little more when tied to the dock. If we live-aboard for 10 years, we clear 'savings' - in dollars not spent - of more than $100K in village rent, ~$200K in town rent!

Cash money, unfortunately, doesn't grow on trees. 

Tenakee labor is compensated at $18 - $25/hour. It's not exactly 40 hour work weeks, so can also stretch wider over time. But let's say 200 person-hours ($5K x 1 person-hour/$25) to earn the $5K cash outlay for LUTRA. Let's add to that our 3K person-hours for construction and round up for a conservative 3.5K person-hours.

Still, it's easy to see that 10 years of rent would require at least 4K person-hours at present rates.

So... well, well!... looks like we save time, too, even when calculating the bare rental alternative to living aboard. An even better dollar deal if we had bought a vessel, rather than DIY.

That being said, while DIY construction plays a role in all this there are middle grounds.

Buying a modest fixer-upper and DIY from there will (most likely) drop your time investment considerably, and quite possibly your layout costs, so give that a good look.

But the big money is in living aboard! Sail away from the dock if you can.

***

In reality, all of this is vastly more complicated. We don't begin to examine, here, the costs of gainful employment (commutes, clothing, peer outings, etc. inherent in the alternative). We haven't calculated equity and resale value vs. zero for rentals. We don't know how to count our time entangled in town while building. We haven't considered costs of maintenance and repair. We don't know how to evaluate what we learn while building, and how that pro-rates over the years. We don't know if we'll get that 10 years ahead, much less the 20 or so we have fair reason to hope for.

We keep in mind that, at the end of ten years, we still own our vessel  / home ; it's just another rent-due month for the alternative.

I started this post musing in print. I'm pleased to see that the numbers appear to crunch in our favor in both money (I was pretty sure) and time (surprise!). My sense is that, given a simple, low-overhead lifestyle, living aboard and sailing remote, the numbers tilt even further in our favor.

So don't let a little thing like money stop ya!


Saturday, November 1, 2025

Rigged for Success: LOM/Ljungstrom + Quick-Rig Booms


MUSTELID's LOM Main and Ljungstrom Foresail


Live life as if everything is rigged in your favor.

-- Rumi


Rigged for Success: 
    LOM/Ljungstrom + Quick-Rig Booms

I'd like to share a suite of ideas toward a family of lesser known rigs for smaller vessels that I think show a great deal of promise. Part historical, part convergent evolution, part innovation, the result is a simple but versatile, robust rig that can be DIYed at low cost.


Leg o' Mutton (LOM) Sails

This tasty moniker simply means a triangular sail. They're commonly used for headsails (jibs, staysails, etc.), mains (often called Bermudan sails) and drivers (small sails set far aft).


Ljungstrom Rig (2 x LOM)

Ljungstrom Rig uses a pair of LOMs, joined along their luffs and set on a free-standing, rotating mast. No booms were used to avoid troublesome impacts with crew.

This configuration works similar to twin head sails off the wind. From a beam reach on up, the sails are doubled over to one side and sheeted as one.

Pros:

  • Boomstrike is eliminated (the rig's original focus).
  • Light, inexpensive spares and gear.
  • Quick set/reef, roller un/furling via the mast.
  • Sailing off-wind, one side can be jibed for 'instant' 50% reef.
  • Sail area aloft catches higher, upper wind-flows.
  • Low Center of Effort (CE).
  • Twin sails tend to center down the wind.
  • Potential for hands-free operation.
  • Sail steering is straightforward (haul to the side you wish to sail).
  • UV resistant fabric along luff and foot eliminate sail covers.
  • At least in smaller vessels, the furled rig is easy to set and strike, and compact for storage.

Cons:
  • Lack of a boom makes spreading sail difficult (especially on narrow hulls).
  • No clew outhaul or vang options.
  • In contrast to twin stays'ls (unless the mast is canted) it generates no bow lift.

Adding a Boom

The addition of a boom set under a loose-footed LOM allows spreading, a clew out-haul and vang, addressing the main cons.

Interestingly, this approach was taken by both the Sea Pearl 21 (adventurously sailed by Stephen and Ginny Ladd, among others), and is marketed as Holopuni Quick-Rig (by Holopuni Canoes). Convergent evolution?

Both of these designs lead their clew outhauls via track along the top of the boom and sheets to the end of the boom. When the sail is reefed, the upward pull of the clew at mid-boom is resisted by the end positioned on the mast and the downward pull of the sheets at boom's end. 

As a sail's belly is blown full, pulling the clew strongly toward the tack, the boom resists in compression. If it is deflected from straight by the perpendicular pull of the clew between mast and sheet lands, that strength plummets. Usual solution? A heavy boom or one made with expensive, exotic materials.

Hmm.

What if we oppose sheet and clew tensions by having them meet at the same point? They cancel out, unloading the mid-boom! The clew outhaul - led to boom's end, then turned back toward the mast to the clew completes the picture. A rope grommet - travelling along the boom - is the perfect attachment point... simple, cheap and DIY.


Principle parts of the rigging...
This platform and 'collar' are primitive but functional

How We Go About It

Rotating Mast and Gear

In our small-ish boats, we went with a thumb-sized dowel protruding from the rounded bottom of the mast. This is inserted into a hole in its step - a fixed plate of thick HMD (cutting board plastic). This secures the foot but it allows it to rotate with very little friction. The upper partners are simply a loose-fit, fixed square around the mast. The distance between step and partners should be between 10% (minimum) and 15+% (healthy) of the mast's overall length for adequate cantilever.

A gate can swivel open to free one face for raising/lowering or close and lock to contain it. 'Box' sides at the step hold the foot in place for lowering. A pin led through one side and into a corresponding hole in the lower mast prevents rotation against high winds or rock and roll.

Each boom requires an arrangement that fixes their height above the partners, yet allows the mast to rotate independently. 

Our solution is a platform affixed to the mast with a collar from boom's mast end, around the mast, set above the platform... the collar is not so loose as to slip below the platform, but not so tight as to grip the mast.


Booms

Booms can be quite light as compression span decreases as the sail is reefed, and diameter per unit of span increases - functionally speaking, reefing makes them stronger. Further, they are subject to no significant side forces along that span. Sea trials help settle in on a light boom with comfortable margins of safety.

Each boom has a rope grommet loosely fit around it (sized so it doesn't bind when pulled at a flat angle). 

We fix a pinch cleat for the clew outhaul at the boom's mast end, pinch horn down (10deg) toward the distal end. This allows the line to ride over the non-pinch horn (up and toward the mast), under control hands-free as it pays out while furling.

A ring seized to the distal end of the boom turns the outhaul back toward the grommet.

The outhaul leads from its cleat, through the grommet (helps control a slack outhaul) to the turning ring, and back to the grommet. We fix it to the grommet's upper side, allowing a tail which is tied to the clew. We prefer little play between clew and grommet.

The sheet is fixed to the grommet's lower side and led to deck level. A turning device (multiple or travelling for an improved lead?) leads it toward a clear, handy to the crew. We prefer enough friction on the cleat to hold in steady wind but ease in heavy gusts... no lock hitch.


Sails

We used light nylon fabric to build flat-cut sails. These are responsive, and furl neatly around the slightly tapered masts. They are stretchy enough to take on some belly (camber) when full of wind.

Downside is that camber can't be flattened easily in high winds. But reefing is so easy, we can reduce power that way.

For 2xLOMs we screwed the webbed luffs to the mast, but are now considering a pocket for easier installation and removal. Others have found that a simple lanyard from tack to mast is sufficient for furling.


Handling the Ljungstrom

We set the Ljungstrom sail well forward, where it can pull us bow down the wind. 

We don't typically vang our sails to flatten them. Instead, we vary the sheet leads and/or reef a little more than we might. This avoids extra gear, handling and the heavier booms required. Personal call, however. 

Furled Set Up

When furled, the sail is snugly wrapped around the mast. The boom(s), if any, are vertical. Sheets are left slack and hanging. One clew outhaul is marline-hitched once or twice along the mast, securing all the bits, then made fast at its pinch cleat (low).


Setting Sail

Unhitch the outhaul, then refasten to its cleat. Uncoil sheets and lead aft to their cleats. Both outhaul and sheets will go slack as the sail is unrolled. Unpin mast if locked.

Depending on wind, you might wish to round up. For downwind departures, you may have to work in stages, trimming sheets as you go.

Unroll the sail by rotating the mast (we prefer 'righty-tighty; lefty-loosey' as standard... we do this by hand, but various rope windings are possible).

Once unfurled as far as desired, haul the outhaul(s) for the curve you wish, then make fast. Trim sheets and fall off to heading. Backing sail is easy and effective. If you wish to open the sails, do so.


On the Wind

Here the sails are overlapped and are sheeted as one (outer one generally the focus of our attention). They handle pretty much as any boomed LOM.

Off the Wind

Sailing off the wind, the sail is typically balanced like a delta kite. All things being equal, it want s to hold the bow centered downwind. More belly is often a good trade-off against more area.

To steer using sail, haul the sheet on the side toward which you wish to turn (easy, now!). This shortens its force vector and directs it to that side. The opposite sail, now relatively stronger and with a longer lever-arm, works to rotate the hull that-away. Like the reins of a horse!

In a heavy gust, you have a 50% reef at hand. You can jibe one sail (lapping one over the other) or let it fly (this can be harder to retrieve... get a wide angle). But if this comes up, consider roller reefing ASAP. Consider that, in high winds, you don't have to set them wing and wing... they sail well as one.


Odd Situations

If a sudden squall has invited letting both sails fly (they're trailing down the wind from the bow), calmly roller reef until you can bring them in and under control.

If such a situation has reversed their usual sides, don't panic... just hand the sheets around the mast, or refasten them for a fair lead and carry on. The sails won't care.

The whole mast, sails and all, can be furled, hitched up and let over as a sea-anchor.

All in All

We found these LOM/Ljungstrom + Quick-Rig Booms to be simple, cheap, versatile and powerful. Each piece is DIY-able from scavenged materials. Nothing about them couldn't be made in the field, at a pinch.

The lightness of the spars is a BIG advantage, especially as we age. The masts should be manageable for as long as we're likely to be able to row.

In researching the history of the rig, the few who have used it are soberly impressed by its virtues. It is not the fastest rig out there, but its no slouch, and pays its way with easy handling and quick reefing.

I'm hoping to see more of these on the water in the coming years!


Full Ljungstrom / Reefed LOM
Sprit-Boomed LOM Aft


References

Sea Pearl 21 Review by Josh Colvin

About Holopuni Canoes by Nick Beck

Rigging MUSTELID and MUSTELID Voyage by Anke and Dave


Monday, October 20, 2025

LUTRA Update: Building Blues and Bloom


A Work in Progress


Rome wasn't built in a day.

-- Old saying


LUTRA Update: Building Blues and Bloom

There are two things I yammer on about:

  1. Small is beautiful.  - E.F. Schumacher
  2. Curves and angles add to building time and effort.  - Me
Yeesh. I should listen to myself.

We're just rounding the one year mark on what we'd estimated to be a four month project. Six months if the stars mis-aligned.

A winter build - now approaching another? -  interrupted work with deep-freezing spells and general hypothermia, leaving us staring stupidly at simple tasks. Weather - exceptionally cool/cold and wet stretched from that winter, through spring to latish July, bringing mildew in its train. A series of guests (whom we thoroughly enjoyed) brought a warm spell that ended promptly with their last departure. Back to hypothermia. Our short-handed community has needs with few to step up. Our own life has chores that can't be indefinitely deferred.

It adds up to a blues riff.

But one step in front of the other. The structure is complete and we're building and tacking on gear (hatches, tabernacles, bow rollers, cleats, rails, rudder/tiller, etc.). In a week or two - barring further issues - we'll start the simple interior, then windows, then launch. we're hoping for 2025.

So we persist. We dream of returning to life at large among the islands.

We bloom.


*****

It's a challenge taking photos from point blank!


Rowing Cockpit from Forward
Longitudinal Seat/Lockers between Self-Bailing Decks
Main Tabernacle at Main Bulkhead


Rowing Cockpit from aft
Longitudinal seat lockers to Leanbank/Fo'c'stle Hatch
Fore and Main Tabernacles visible


Tuesday, September 9, 2025

Tulle + TBIII + Paint: A Promising Sheathing Combo


Save that Veil...
It's Tulle!

Because, in your dreams, every detail matters.

- Wedding Veil Ad Copy


Tulle + TBIII + Paint: A Promising Sheathing Combo

In our endless search for cheaper solutions to common problems, we seem to be closing in on a minimum. Specifically, in regards to a plywood sheathing system.

Previous posts - More Than One Way to Sheath a Boat and Deck Sheathing: Alternatives to Fiberglass and Plastic Resins - explored alternatives we've tried. Our state-of-the-art is woven acrylic fabric (sometimes sold as 'Dynel') providing a matrix for TiteBond III water-based (but 'proof') glue.

Problem is, formerly cheap acrylic went from about $5 to $25 per yard (yikes!) over the last ten years.

So we hunted around. Synthetic fabrics of every stripe were durn expensive, and we were reduced to collecting second-hand sheets (not a bad option, but take a lot of piecework).

And there was Tulle (bridal veil material)! We found some made of polyester that covered the horizontal decks of our new boat with plenty to double it on high-wear areas. All for about $1 per yard (less in quantity) through Amazon. TiteBond III is still cheap as paint.

Tulle wets down well, and the drying TBIII first layer has little problem pulling it flat (but help it along creases by spreading flat). It conforms well to tight-radius exterior and interior edges. With two coats of TBIII and topcoat of paint, the result is a moderately textured surface over a thick, reinforced film of hard-set glue protected from UV by paint.

So Tulle looks good as an inexpensive alternative to other synthetic fabrics. Time will tell... the gold standard is about 15 years.

Watch this space!


Our Application Procedure:

  1. Prep surface (smooth and tack-free)
  2. Pre-cut Tulle to fit
  3. Wet down Tulle with water (soaks the wood under)
  4. Immediately brush TiteBond III (ample, but don't sweat it)
  5. Let dry (will draw down Tulle for initial bond)
  6. Lightly sand sharp points, edges or ridges, if any and tack
  7. Apply second coat of TBIII (ample, but brush out to preserve weave)
  8. Let dry
  9. Prime while still 'green' (within 24hrs)
  10. Topcoat


One cool aspect is that, with judicious selection of products and a warm, breezy day, starting with a prepared deck we can (theoretically) manage five coats (2xTB, 1x primer, and 2x topcoat) in one long summer day. And much of that is kicking back and watching it dry.

Cheap AND efficient!

Monday, April 21, 2025

Metronomics: Understanding Roll


Note the weight positions... higher = slower ; lower = faster


Now roll on, Buddy?
Why ya roll so slow?
I gotta roll slow
With my weight so low.

-- Adapting a Folk Song

Metronomics: Understanding Roll

Being an Old Fart, I had the privilege of growing up with mechanical metronomes. Mechanisms - as opposed to algorhythms - that set and keep the beat.

Metronomes keep the beat, adjusting their tempo by sliding a weight higher or lower along a bar

Higher Weight = Longer / Slower

Lower Weight = Shorter / Faster.

Puts me in mind of the dreaded short and snappy roll that fatigues and throws crew around if not overboard. Longer, slower roll periods are desirable. Up to a point. Beyond that point, they can become self-reinforcing and enter 'death roll' dynamics. We're with Goldilocks... we're looking for a sweet spot that's juuuuuust right.

Being a sailor, I can't help but see roll dynamics in the metronome.

Bar = Mast
Weight = Rig's Center of Gravity (CG)
Axis = Hull's Center of Buoyancy (CB)
Counter-Weight = Ballast CG

Tempo = Roll Period

The connection is easy to spot. We can adjust roll period (by raising and lowering the Rig's CG while all other points remain constant.

A baseline is established by weight distribution along the mast, most likely at construction time. Hollow masts offer lots of options for messing with distribution via placing of  internal weights. Choice of hardware (e.g., masthead fittings, blocks, spreaders, etc.) for weight placement all count. Designers aim for one-size-fits-most.

Junk Rig is interesting... as the sail is raised, more weight goes aloft. Typically the yard is heaviest at the top, while battens average out(?) along the mast. The total effect is that more sail slows roll.

This suggests the possibility of elective roll period manipulation via weight that can be raised and lowered to adjust for conditions. The challenge would be a 'doohicky' which would observe these Thou Shalt Nots...

  • Not be difficult to deploy
  • Not interfere with the rig
  • Not swing wildly
  • Not be difficult to dowse
  • Not be difficult to stow
While giving a seriously positive return cost/benefit ratio-wise.

Clearly, the need for roll control will all have a lot to do with the roll dynamics of the hull in question. Low form stability (/easily driven) hulls will benefit more; Form stable (/it's complicated) hulls will benefit less.

How do you roll?

Wednesday, March 12, 2025

Simple Sampan


Sampan Bow
Arrow points to the forward end of the straight chine
a.k.a aft end of the bow curve


Simple Sampan met a Boatman,
    With a seaward stare;
Says Simple Sampan to the Boatman,
    “Let me take you there.”

- Olde Mother Sloops


Simple Sampan

Sampan bows have several benefits over western, pointy bows.

They add positive buoyancy at the bow, reducing pitching and helping to ride up and over waves (rather than plow through them). More interior volume is added for forward storage. Forward deck space is widened for better footing and anchor handling. Wide flare at the bow helps toss waves to the side, rather than over the top. The wide forefoot is more stable on a steep beach. It's much easier to roll a cross-log under to protect the bottom on a rough beach.

We LIKE 'em!

With two sampan bows under our belts, I'd like to share some thoughts on dumbing the process down to manageable. This approach uses western design techniques, but leaves the bow to a traditional, 'follow-the-materials' attitude.

In designing your own approach, consider models from paper or cardstock. Fast and cheap compared to plywood!

NOTE: I've simplified since the first draft!

Simplifying approaches

  1. Use constant flare
  2. Begin with parallel sides, straight along sheer and chine
  3. Use a simple, fair bow curve at the forward end (approaching a circle)
  4. Build to forward end of the straight chine with bow extending past
  5. Roll bottom upward to plank the bow
Okay, let's unpack that... I'm going to boldface some common boat terms you may have to look up to keep it short...

Decide the amount of flare. The simplest case is a constant amount of flare, which produces constant bevels along the chine. We find slope to be the easiest to work with, often 3in of lean-out per vertical foot. A changing amount of flare produces twist, which introduces rolling bevels and generally complicates things.

Parallel, Straight Sides - When laid flat, these are like wide planks. When bent over flared stations that converge toward bow or stern, they develop parallel curvature... 'sheer' along the sheer and 'rocker' along the chine. The more flare and the more the ends are brought inboard, the greater the curvature.

Phil Bolger (TEAL, among others) and Tom MacNaughton (SILVER GULL series) and others have designed handsome, capable vessels with this approach to side planking.

Fair Bow Curve - This curve provides the sampan shape. A curve closer to a circle provides a more blunt entry, while a curve closer to half a parabola makes an easier entry. This is laid out directly on the side planking.

Build from mid-section to fwd end of straight chine - This portion of construction is very easy. Constant bevels and simple, fair curves. Under these assumptions, side heights are all the same. The whole thing pretty much shapes itself! 

Meanwhile, the curved bow ends are sticking out there in space. Depending on your building philosophy, the bottom can be planked to this point with the proviso that you will need to continue bottom planking forward, rolling it up and over the curved, Sampan ends. 

Roll the bottom upward - To make the curve with plywood planking you will likely have to use kerfs.

If not using tape and glue construction, we find 'nailers' to be an easy method. Basically, these are planks along the curve to which the bottom can be mechanically fastened (nails or screws).

Ply Nailers installed and trimmed to bow curves...
Planks are a better choice, if available


Planking up the bow...
Note kerfs visible across upper bow


Nailers after bow is closed


As you can see, you have to get creative with clamping. There are a zillion ways to go. Most of them work, eventually. Try to find what works best for you!

NOTE: The black schmooey is DAP Polyurethane. Very strong bond, highly elastomeric, workable and about 1/4 the price of some of the name brands.


Complexifications

The previous assumptions are the simplest among flared side designs. But each builder and vessel is individual... you get to decide what pays off in your long-run. Your design and/or construction abilities will loom large at the beginning. A long-term benefit may well reward extending those abilities at the outset. Simplest is always fastest, but that's not the only question. Weigh it up!

Both chine and sheer curvature can be enhanced or diminished by curving one, the other or both (not necessarily parallel). Lofting will take up more of your time.

We cut our sides down from a single run of full width plywood, so strictly parallel sides are arbitrary. We chose to add a little extra sheer for vanity's sake (okay... it also gives a little more freeboard, forward, but that's pretty minimal). 

Note the riser above parallel over the forward end... that's a simple way to get extra freeboard, storage and foremast bury. In MUSTELID, we built it up from the sheer; in LUTRA, we're simply cutting above the (nearly) parallel cockpit line.

As mentioned twist complicates matters, but may pay in the long run. Generally, it helps increase sheer and rocker, and narrows the forefoot (for an easier entry). There's a bit of extra twist available for 'free' along the bow curve... consider making sure that it fairs in along sheer and chine with no hard spots in their longitudinal curves.

Bulkheads don't have to go anywhere in particular, but it's handy to have one at the point of maximum beam (not necessarily mid-ships) and one at the forward end of the straight, parallel chine, both definitive points. Intermediate bulkheads need to be adjusted for their position on the curvy sheer and chine. Many vessels can be designed and built around their bulkheads, with no temporary stations at all.

Simple's a great place to start, but you're not obliged to limit yourself!

*****

Box Barges are as simple and easy as a boat gets. I'd put parallel sided, flared vessels at the next rung of difficulty; still in easy reach. Giving up parallel takes another rung, but we're not dizzy, yet.

A Sampan Bow complements all three, and comes down right handsome in flared hulls!


Related Post: Roll Your Own


Sunday, February 16, 2025

LUTRA: One More @%! Boat


LUTRA
30ft x 5.75/4ft x 1ft
...a Sampanic Shorpie?


LUTRA -- Genus name of otters, order carnivora, family mustelidae.

Sampanic -- Having a bow resembling a sampan.

Shorpei -- Sharpie / Dory / Shorey (as distinct from any one of those?).

Meso-Cruiser -- Bigger than a micro-cruiser, smaller than a full-sized cruiser?


LUTRA: One More @%! Boat

Well, here we go again.

A quick recap of our so-called 'retirement plan'... WAYWARD, our home of the last decade is capable and comfortable, but requires a deal of physical input to sail and maintain. As we age, we expect that it would become our less mobile live-aboard. To stay mobile for longer, we added MUSTELID to the mix as an easily handled camper-cruising forager.

MUSTELID's sea trials showed us that she is more than a fair weather sailor, and quite comfortable for longer term life aboard. We feel that we could, in a pinch, make her our sole live-aboard, though in spartan fashion. By nature, however, we lean more to hedonism than asceticism.

Got us thinkin'; always a dangerous activity.

Easy handling is optimal in the smaller vessel, but maintenance on the two vessels is more than WAYWARD's alone (duh). M's lack of insulation and light build puts her at the wrong end of the comfort spectrum... for about six months of the Alaskan, rainforested year, it's cool to cold living. Stowage is minimal (only enough for about four months if depending on food stores). Tools are limited to band-aid level repairs (not reconstruction). No copper plate.

Hmm.

We decided that an enlarged version of MUSTELID would meet our needs in one package. Easy handling, less maintenance, comfortable (and better organized) living aboard with enough displacement to carry longer term gear and outfit. When we're out cruising, with all eggs in one basket we won't worry about the boat left behind.

LUTRA vs MUSTELID

LUTRA is designed on the same general plan, but 6ft longer than M and twice as deep (1ft vs 6in for nearly 2x displacement). We've raised the cockpit sheer by a foot to allow self-bailing decks, wider footing and more storage in the T-locker. The resulting, higher (and widened bow) yields more lift over seas... this might be necessary to counter the increased momentum of a heavier boat.

  • 9ft rowing cockpit (vs 8ft) relaxes our spacing.
  • 3ft aft locker (vs 2ft) adds 'deep' stowage area and extends the aft deck.
  • 12ft cabin (vs 8ft) 
    • Adds room for a small 'chest of drawers' each (more efficient storage).
    • Allows bedding to be moved forward, clearing a space for cook and fire while one of us slugs abed (we call the doubled bedding 'Cloud-Nine'  😴 ).
  • Double displacement floats thicker walls and double windows (improved insulation), copper plate, extra stores and gear, and a thermal-mass rocket stove (design in the works).
A longer, deeper hull, heavy bottom and copper plate will increase form stability and add considerable ballast stability for an even stiffer boat. This allows a more powerful rig, though we'll keep it snug against the sudden williwaws to which our area is prone. Dimensions shown are about the max we might be comfortable with. Reefing is (supposed to be) a snap and sheets are very easy to release, so we'll see.

In particular, we're trying another possibly hare-brained idea:

 The mid-sail is drawn quadrilateral, spread by a sprit and boom inspired by Holopuni Quick Rig. First reef is to brail the sprit vertical (leaving a Leg O' Mutton, triangular sail standing) and rotate the mast one turn to wrap sprit and bunt. From that point, reefing is all roll-furling around the mast as .we've been doing. With luck, this will retain the easy handling of the simpler, LOM (Leg O' Mutton) sails from M.

This increases sail area and drive while moving the CE aft a ways. This will decrease lee helm from the forward sails and hopefully enhance windward performance. With luck, we'll get away with hanging the off-centerboards (which double as filler planks for a cockpit platform) from the forward end of the cabin in the blindspot at the chest-of-drawers.

We've widened the sampan bow which will allow us to use a foremast case. We'll be able to drop it without lifting it clear of the partners (a spooky operation when wind and water 'get up'!). It will be self-bailing and drain clear of the water.

Another departure is eliminating the cabin tumblehome in favor of one-piece sides. This simplifies construction, adds knockdown buoyancy in the BIRDWATCHER style cabin and helps reduce rain on the windows for better visibility.

Other than that, we'll be keeping most of M's features, only adapting as necessary.

The as yet open question is whether we'll be able to row LUTRA at speeds approaching 3kts. On the one hand, her longer waterline length affords about 7kts of Hullspeed (vs M's 6 1/3kts). On the other, we are doubling the underwater cross-sectional area and increasing wetted surface, both of which increase resistance. We'll be thrilled if we gain speed under oars; content to match speed; mildly disappointed to lose a little; chagrined to lose a lot.

Time will tell!


Getting Going

We were all set to build in a beautiful, remote location near Tenakee, but not too near (allowing us to concentrate on the build). Unfortunately, some friends suffered a series of misfortunes and we stepped in. We were glad to help out, but summer and a chunk of fall evaporated with no sure end in sight. We were offered a site in town, so moved back in and got started in late September of 2024.

It's cold and slow going. We're not as resilient as we used to be. Town life is lovely as always, but full of attractions and distractions. But we're chipping away at it.

At present, the hull is complete and we are about to copper the bottom with plate stripped from WW. It's well below freezing, at present, so we're prepping the plate and hoping for a few days of higher 30ºFs/low 40ºFs to render a waxy tape (sealant for the copper) more pliable.

Here's from a few days ago:


Thursday, January 23, 2025

Tiny Tools: Toward a Compact Tool Set


The right tool for the job?
It's complicated.


Tiny Tools: Toward a Compact Tool Set

Keeping a full set of tools on board to handle any repair / rebuild / maintain job that might arise out there is great insurance.

But we who live in small spaces must be picky-choosy. If we can, we look for the following attributes in our tools:

  • Competence - They must be able to get the job done.

  • Versatility - The more jobs they can tackle, the better.

  • Synergy - They should work well with other tools.

  • Economy - Either inexpensive or long-lived (preferably both!).

  • Small Footprint - Small is beautiful! 


Anke and I acquire what looks to be useful. Often (not always) a low purchase price indicates low quality. But we've got a tool in hand, and often find an opportunity to trade up down the road. Much more often, we'll find that a problem we face was well-solved back in the day, and we can find used tools that are no longer in common parlance for dimes on the dollar.

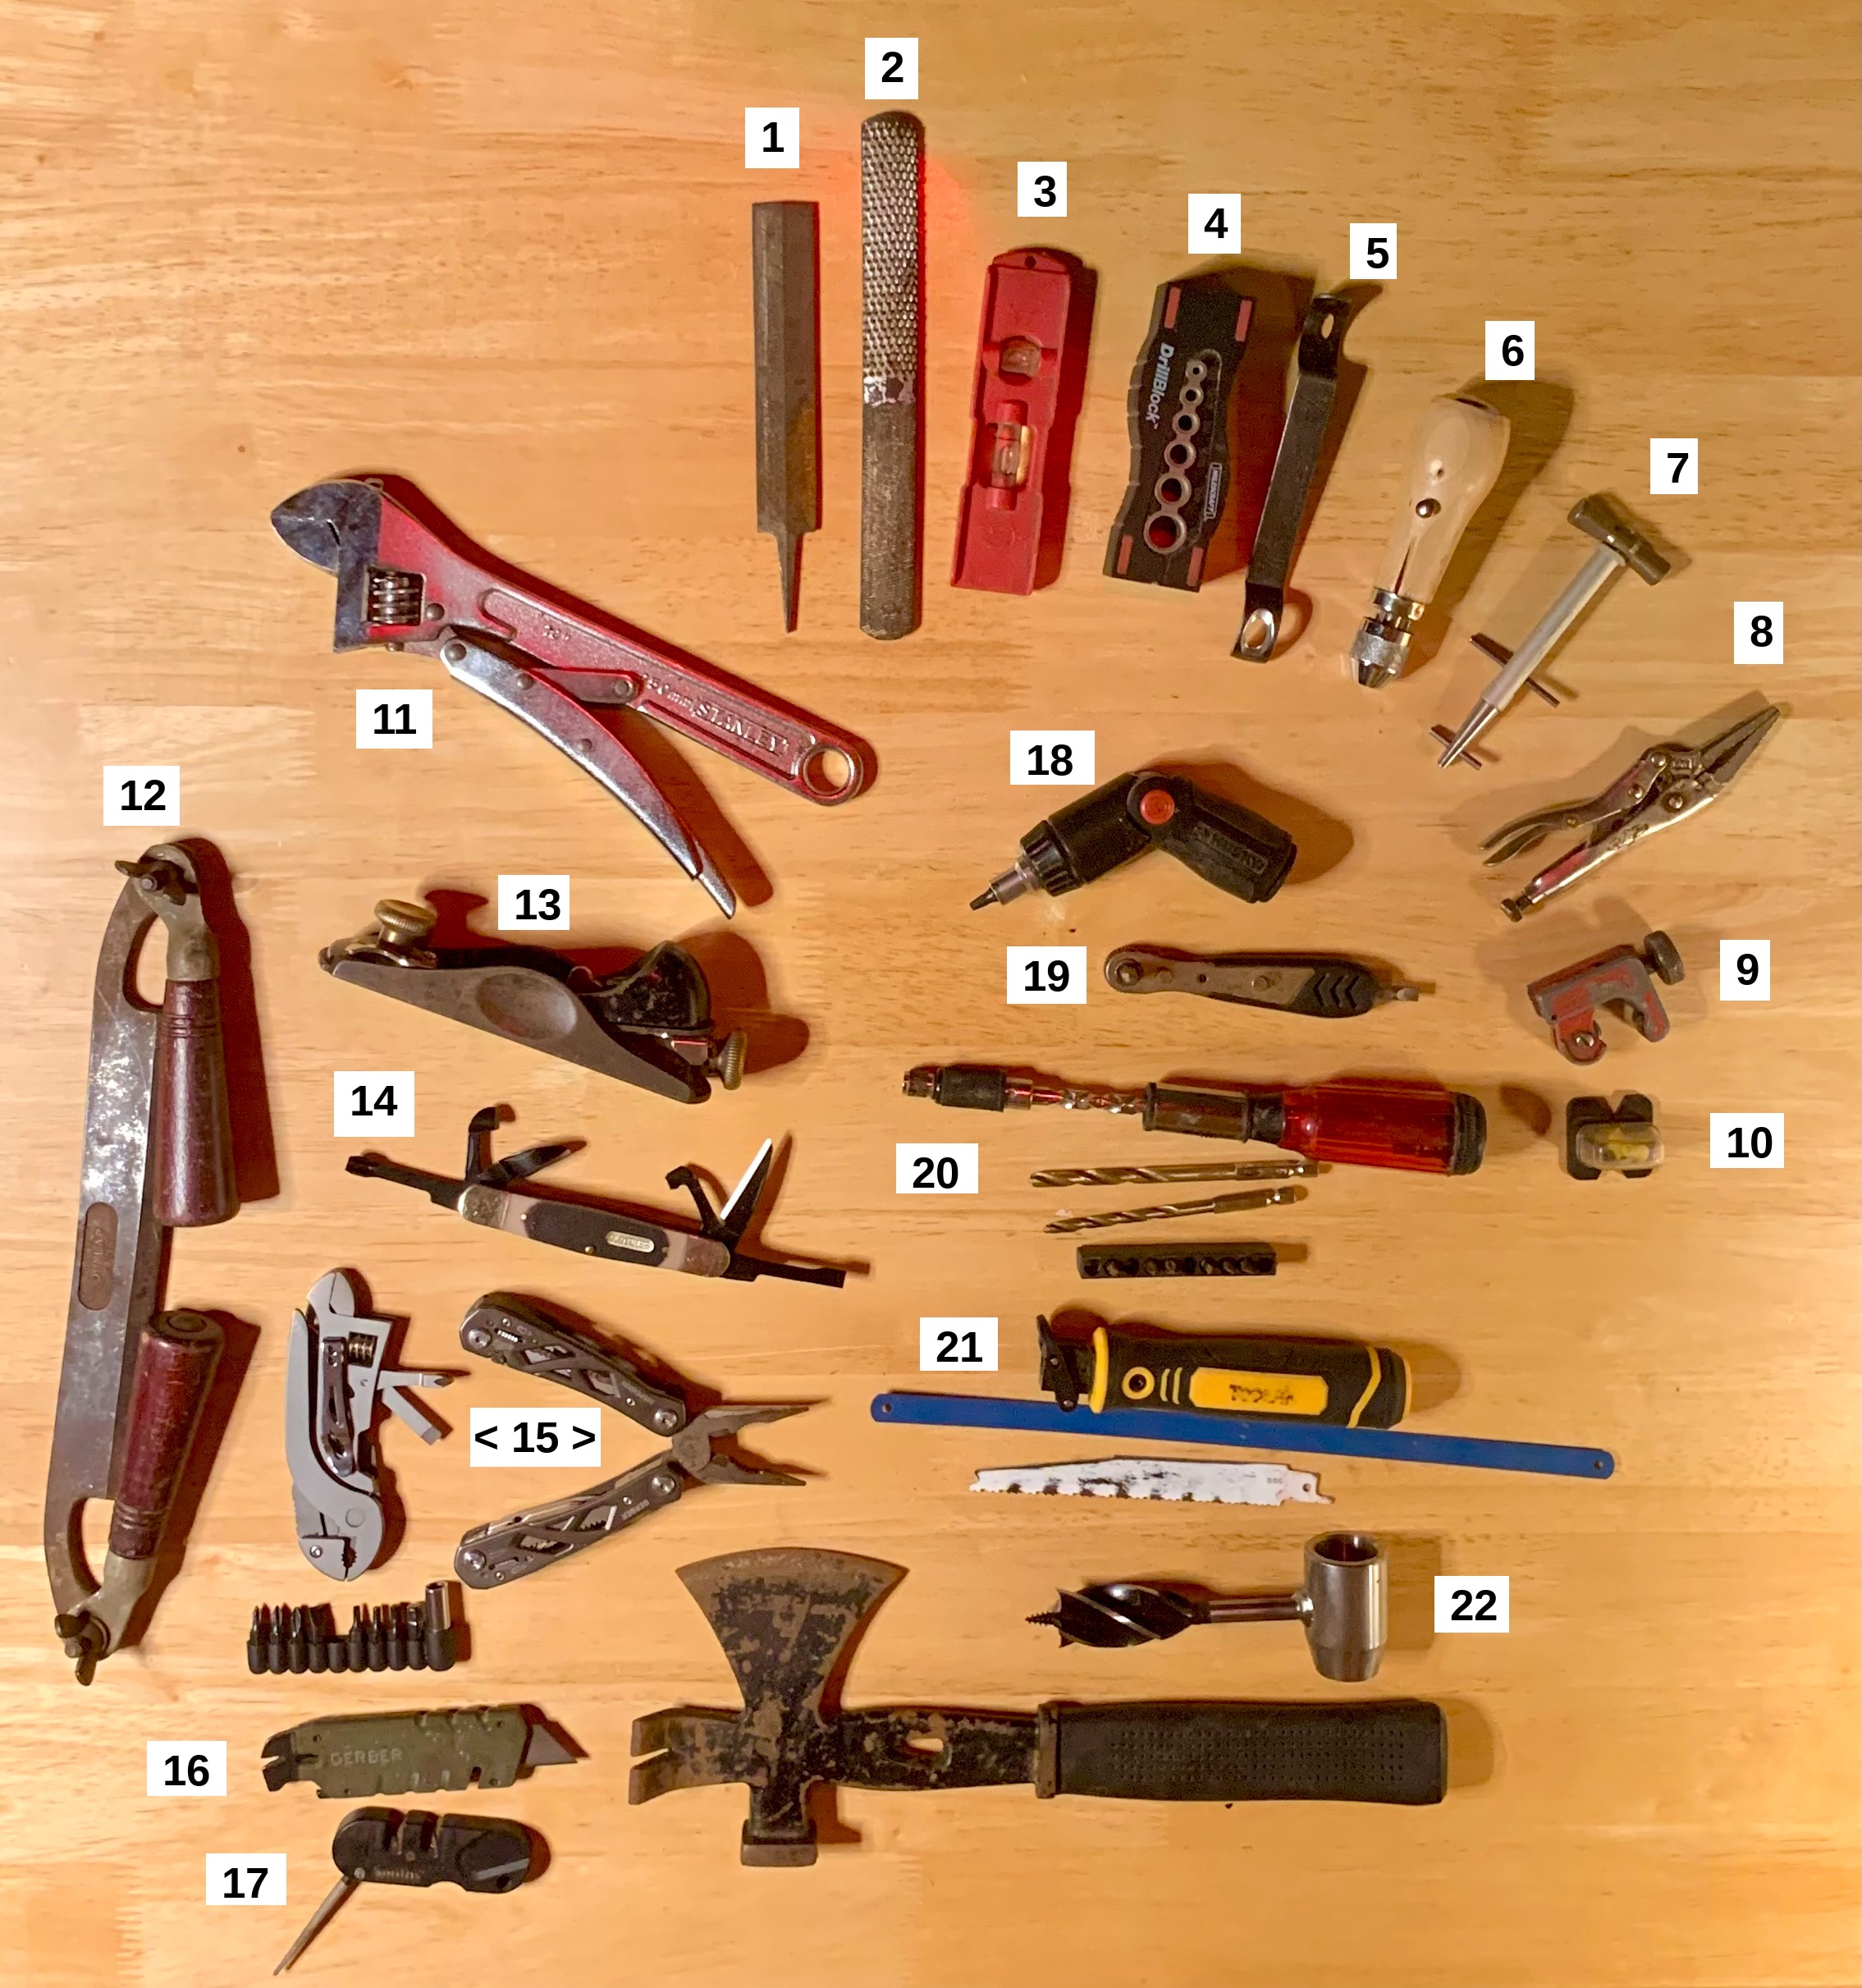
What follows is an annotated list of some of the less well known tools we've found to be both compact and useful. Please excuse signs of salt-water exposure... they're lately having a rough life!

*****


Notes

  1. Feather File - Very fine edges and a medium cut.

  2. 4-Way Wood Rasp - Flat and convex faces in rough and medium cut.

  3. Small Level - To be honest, I've never used it on a boat. But for infrastructure?

  4. Drilling Jig - Solid 90deg drilling guide when required (e.g., block pins).

  5. Veritas(TM) Rounding Tool - 3/8 and 1/4in round... on plank and ply edges.

  6. Stitch Awl - For heavy sewing (e.g., leather, sail patches, etc.).

  7. Clamp-Tite(TM) - Forms and locks a tight, light wire clamp similar to a hose clamp but any size (larger tools available). Great for clamping a broken spar or any hose.

  8. Needle Nose Locking Pliers - Very versatile. Great for working copper tubing. These are VISE-GRIPs(R).

  9. Pipe Cutter - We use this to cut copper tubing to 3/4in.

  10. (Ferrous) Nail Finder - Magnetic post points to a hidden ferrous nail. If using non-ferrous fasteners in hidden-frame construction, steel locator nails can be included to help find hidden framing years down the road.

  11. Locking, Adjustable Wrench - Not a 'mini' tool, but unusual. Adjust as normal, then lock down for a secure grip on the nut with no self-adjustments as you work.

  12. Folding Drawknife - Mostly available as antiques.

  13. Low Angle Block Plane - Handles virtually all of our planing. IMHO, low angle planes work as well or better than ordinary angles (with the possible exception of a scrub plane).

  14. Schrade(TM) Carving Folder - A useful carving set for fiddly work in a small package.

  15. Multi-tools - These handle most of our odd-job maintenance work.

  16. Gerber(TM) Utility Knife - For sharp cutting and light prying.

  17. Smith's(TM) Blade Sharpener - V notch and Serration. Complements our Sharpal(TM) Diamond 'Stone' System (not shown).

  18. Ratcheting, Adjustable Angle Bit Driver - These are a great combination. They tend to be not as well made as they deserve, but are cheap and seem to last. We like shorties like this one (Husky(TM)).

  19. Low Clearance, Right angle Bit Driver - For tight spaces (about 1in). This one also accepts an in-line bit at handle's end (convenient!).

  20. Bit Driving, Ratcheting Push 'Drill' (aka 'Yankee') - Saves a lot of wrist work, and with the hex-bit drills shown, can double as a light duty drill. Check that it accepts hex bits... the true Yankees had a superior but no longer standard split shanks system.

  21. Hack-, Jig- and Sawzall Blade Handle - This particular model accepts all three with a quick and secure release. More are coming available, so shop around. Beware... some of the name brands have been disappointing.

  22. Hand Auger/Dowel Maker - 'Shawn of the Wild' improved a Scotch-Eye Auger by lengthening the ring, setting its I.D. to the O.D. of the auger bit and creating a pocket mortise-and-tenon machine! Brilliant!!! Many are following in his footsteps but beware, not all are clear on the concept (especially as found in sets).

  23. Utility Hatchet - These vary in quality, but if well made are handy li'l guys. They can be modified to suit your tastes (e.g., shape and cross-hatch the hammer head or change the cutting bevel of the hatchet head).


We have a universal socket (one of those with lots of pins which fit around any nut). Though not as robust as a solid socket, it can handle a surprising amount of torque. Plenty to make it useful for most of our needs.


Better yet, we have a Metwrinch(R) Set. Instead of dual Imperial and Metric sets, with 'teeth' bearing on nut corners, these have 'cams' bearing on nut flats. The play provided before bearing hard allows one tool size to securely grip near neighbors from either system. AND, since it's not bearing on the corners, there is little to no tendency to strip. In fact, they work until the flats themselves are rounded away.


Folders

  • Fastcap(TM) 1in Chisel - These guys offer a range of standardized, folding tools, singly or in kits. They include chisels, saw, rasp, putty and linoleum knives, scratch awl, etc.. Very well designed and made.

  • 'Butterfly' Dozuki / Ryoba Saw - Folded handle protects blade (and us!). This one is about 6in folded.

  • JOIC(TM) Folding Drill - This one is antique only, but what a tool! Handle folds 90deg and screw end-cap holds bits. Chuck and gear rotate 90+deg. At about 9in, it can fold way down and function as an angle drill to 90deg. Both options lock down securely. We saw many of them on Ebay.

  • SvenSaw(TM) - Simple, solid set-up and stows in-line. These have been around for 60 years, now. My only quibble is the teeth are pulse hardened, so can't be kerfed... we're looking for untempered replacements for all our bowsaws.

*****

These aren't our whole toolset, but they do 90% of the work. The rest are fairly standard heavy lifters.

On WAYWARD, we have a large toolbox in deeper storage and a small one at hand. Many of these small tools go into the little one, and handle our day-to-day needs quite handily. It's not until we're really building something major that we dig out the big 'un.

For the future, a smaller vessel will require fewer tools and favor a yet smaller footprint. The quest for the ever-more-compact erector set goes on!


TIP: If we standardize our fasteners (and other such accessories), we can much reduce the necessary tools. For example, limiting ourselves to #10,  1/4in, 3/8in, 1/2in and 3/4in screws and bolts with, say, square drive or hex cap/nuts, both our inventory and tools can focus in.